AEWS 2주차 - Amzaon EKS Networking
AEWS 2주차 - Amzaon EKS Networking
이번에 연재할 스터디는 AWS EKS Workshop Study (=AEWS)이다. AWS에서 공식적으로 제공되는 다양한 HOL 기반의 Workshop과 가시다님의 팀에서 2차 가공한 컨텐츠를 기반으로 진행한다.
0. 실습환경 준비
2주차 부터는 원클릭으로 EKS 실습환경을 배포할 수 있는 코드를 사용한다. 필자는 사용중인 AWS IAM 권한 제약사항으로 기존 CF 코드를 변경하여 베스천용 EC2에 관리자 권한을 위임하여 배포할 예정이다.
참고 : https://cloudkatha.com/attach-an-iam-role-to-an-ec2-instance-with-cloudformation/
- 원클릭 배포
# YAML 파일 다운로드
curl -O https://gist.githubusercontent.com/hyungwook0221/238d96b3b751362cc03ea40494d15313/raw/49de0a9056688b206a41349fc90727d2375f4f02/aews-eks-oneclick-with-ec2-profile.yaml

# CloudFormation 스택 배포
# aws cloudformation deploy --template-file eks-oneclick.yaml --stack-name myeks --parameter-overrides KeyName=<My SSH Keyname> SgIngressSshCidr=<My Home Public IP Address>/32 MyIamUserAccessKeyID=<IAM User의 액세스키> MyIamUserSecretAccessKey=<IAM User의 시크릿 키> ClusterBaseName='<eks 이름>' --region ap-northeast-2
예시) aws cloudformation deploy --template-file eks-oneclick.yaml --stack-name myeks --parameter-overrides KeyName=hw-key SgIngressSshCidr=$(curl -s ipinfo.io/ip)/32 ClusterBaseName=myeks --region ap-northeast-2 --capabilities CAPABILITY_NAMED_IAM

# CloudFormation 스택 배포 완료 후 작업용 EC2 IP 출력
aws cloudformation describe-stacks --stack-name myeks --query 'Stacks[*].Outputs[0].OutputValue' --output text

# 마스터노드 SSH 접속
ssh -i ~/.ssh/kp-gasida.pem ec2-user@$(aws cloudformation describe-stacks --stack-name myeks --query 'Stacks[*].Outputs[0].OutputValue' --output text)
1. AWS VPC CNI
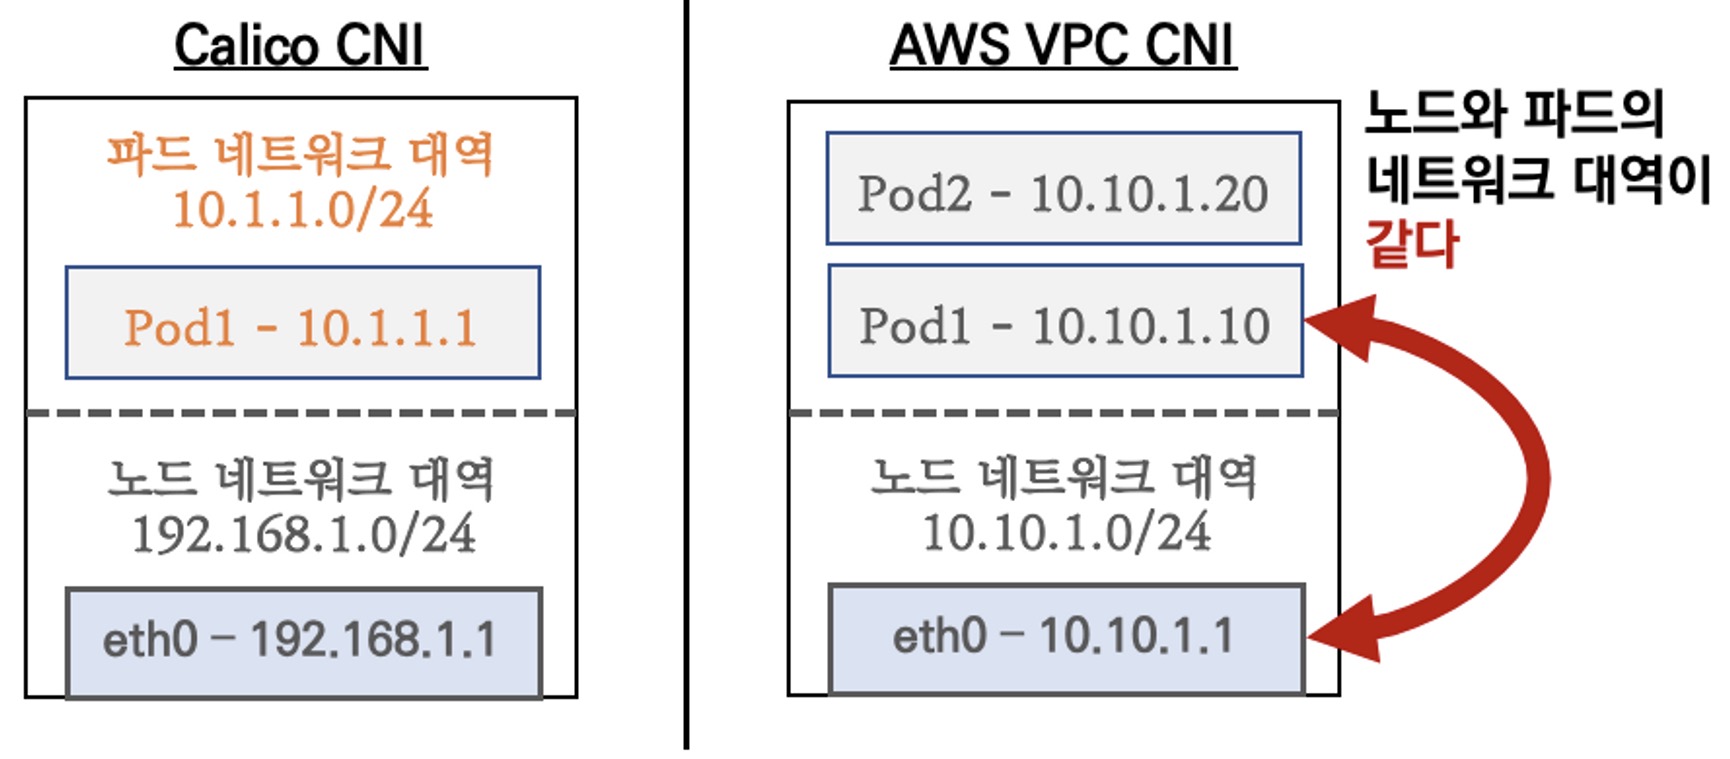
일반적으로 Calico와 같은 K8s CNI의 경우는 Node - Pod의 IP 대역이 다르지만 AWS VPC CNI의 경우에는 Node-Pod 대역을 동일하게 해서 통신이 가능하도록 구성할 수 있다.
일반적으로 Outer 패킷을 감싸서 오버레이로 통신하지만 AWS VPC CNI는 오히려 심플한 구조를 가진다. 이로인해 간단하고 효율적인 통신이 가능하다!
K8s Calico CNI vs AWS VPC CNI 비교
- 네트워크 통신의 최적화(성능, 지연)를 위해서 노드와 파드의 네트워크 대역을 동일하게 설정 (그림출처-가시다)
- 파드간 통신 시
- K8S CNI는 오버레이(VXLAN, IP-IP 등) 통신
- AWS VPC CNI는 동일 대역으로 직접 통신

- 노드간 통신(추후 업데이트)
- 파드간 통신(추후 업데이트)
2. Service & AWS LoadBalancer Controller
K8s 환경에서는 내/외부 통신을 위한 서비스를 크게 3가지 형태로 제공한다.
- Cluster IP
- NodePort
- LoadBalancer
필자는 그 중에서 LoadBalancer 타입을 AWS 환경에서 어떻게 활용할 수 있는지를 집중적으로 확인하고 Consul 샘플 예제와 함께 적용해볼 예정이다.
3. LoadBalancer NLB 모드
LoadBalancer 배포 시 NLB 모드는 다음 두 가지 유형을 사용할 수 있다.
유형1. 인스턴스
externalTrafficPolicy: ClusterIP ⇒ 2번 분산 및 SNAT으로 Client IP 확인 불가능 ←LoadBalancer타입 (기본 모드) 동작externalTrafficPolicy: Local ⇒ 1번 분산 및 ClientIP 유지, 워커 노드의 iptables 사용함

유형2. IP
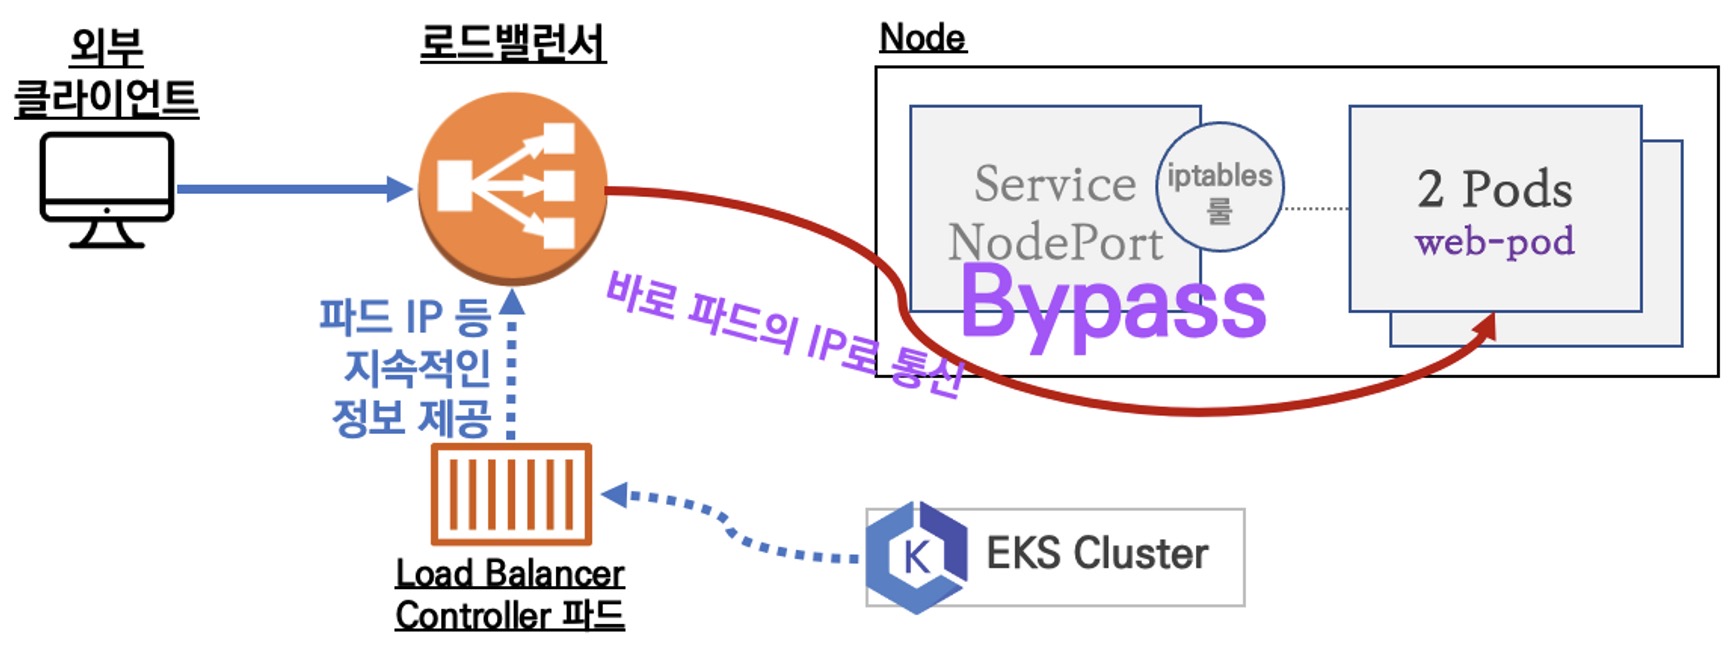
참고 : 반드시 AWS LoadBalancer 컨트롤러 파드 및 정책 설정이 필요함!
Proxy Protocol v2 비활성화⇒ NLB에서 바로 파드로 인입, 단 ClientIP가 NLB로 SNAT 되어 Client IP 확인 불가능Proxy Protocol v2 활성화⇒ NLB에서 바로 파드로 인입 및 ClientIP 확인 가능(→ 단 PPv2 를 애플리케이션이 인지할 수 있게 설정 필요)
AWS LoadBalancer Controller 배포 with IRSA
# AWSLoadBalancerControllerIAMPolicy 생성
curl -o iam_policy.json https://raw.githubusercontent.com/kubernetes-sigs/aws-load-balancer-controller/v2.4.7/docs/install/iam_policy.json
aws iam create-policy --policy-name AWSLoadBalancerControllerIAMPolicy --policy-document file://iam_policy.json

# 업데이트가 필요한 경우
# aws iam update-policy --policy-name AWSLoadBalancerControllerIAMPolicy --policy-document file://iam_policy.json

# AWS Load Balancer Controller를 위한 ServiceAccount를 생성
eksctl create iamserviceaccount --cluster=$CLUSTER_NAME --namespace=kube-system --name=aws-load-balancer-controller \
--attach-policy-arn=arn:aws:iam::$ACCOUNT_ID:policy/AWSLoadBalancerControllerIAMPolicy --override-existing-serviceaccounts --approve

## IRSA 정보 확인
eksctl get iamserviceaccount --cluster $CLUSTER_NAME

## 서비스 어카운트 확인
kubectl get serviceaccounts -n kube-system aws-load-balancer-controller -o yaml | yh

# Helm Chart 설치
helm repo add eks https://aws.github.io/eks-charts
helm repo update
helm install aws-load-balancer-controller eks/aws-load-balancer-controller -n kube-system --set clusterName=$CLUSTER_NAME \
  --set serviceAccount.create=false --set serviceAccount.name=aws-load-balancer-controller

# 설치 확인
kubectl get crd
kubectl get deployment -n kube-system aws-load-balancer-controller
kubectl describe deploy -n kube-system aws-load-balancer-controller | grep 'Service Account'
  Service Account:  aws-load-balancer-controller

# 클러스터롤, 클러스터 롤바인딩 확인
kubectl describe clusterrolebindings.rbac.authorization.k8s.io aws-load-balancer-controller-rolebinding
kubectl describe clusterroles.rbac.authorization.k8s.io aws-load-balancer-controller-role
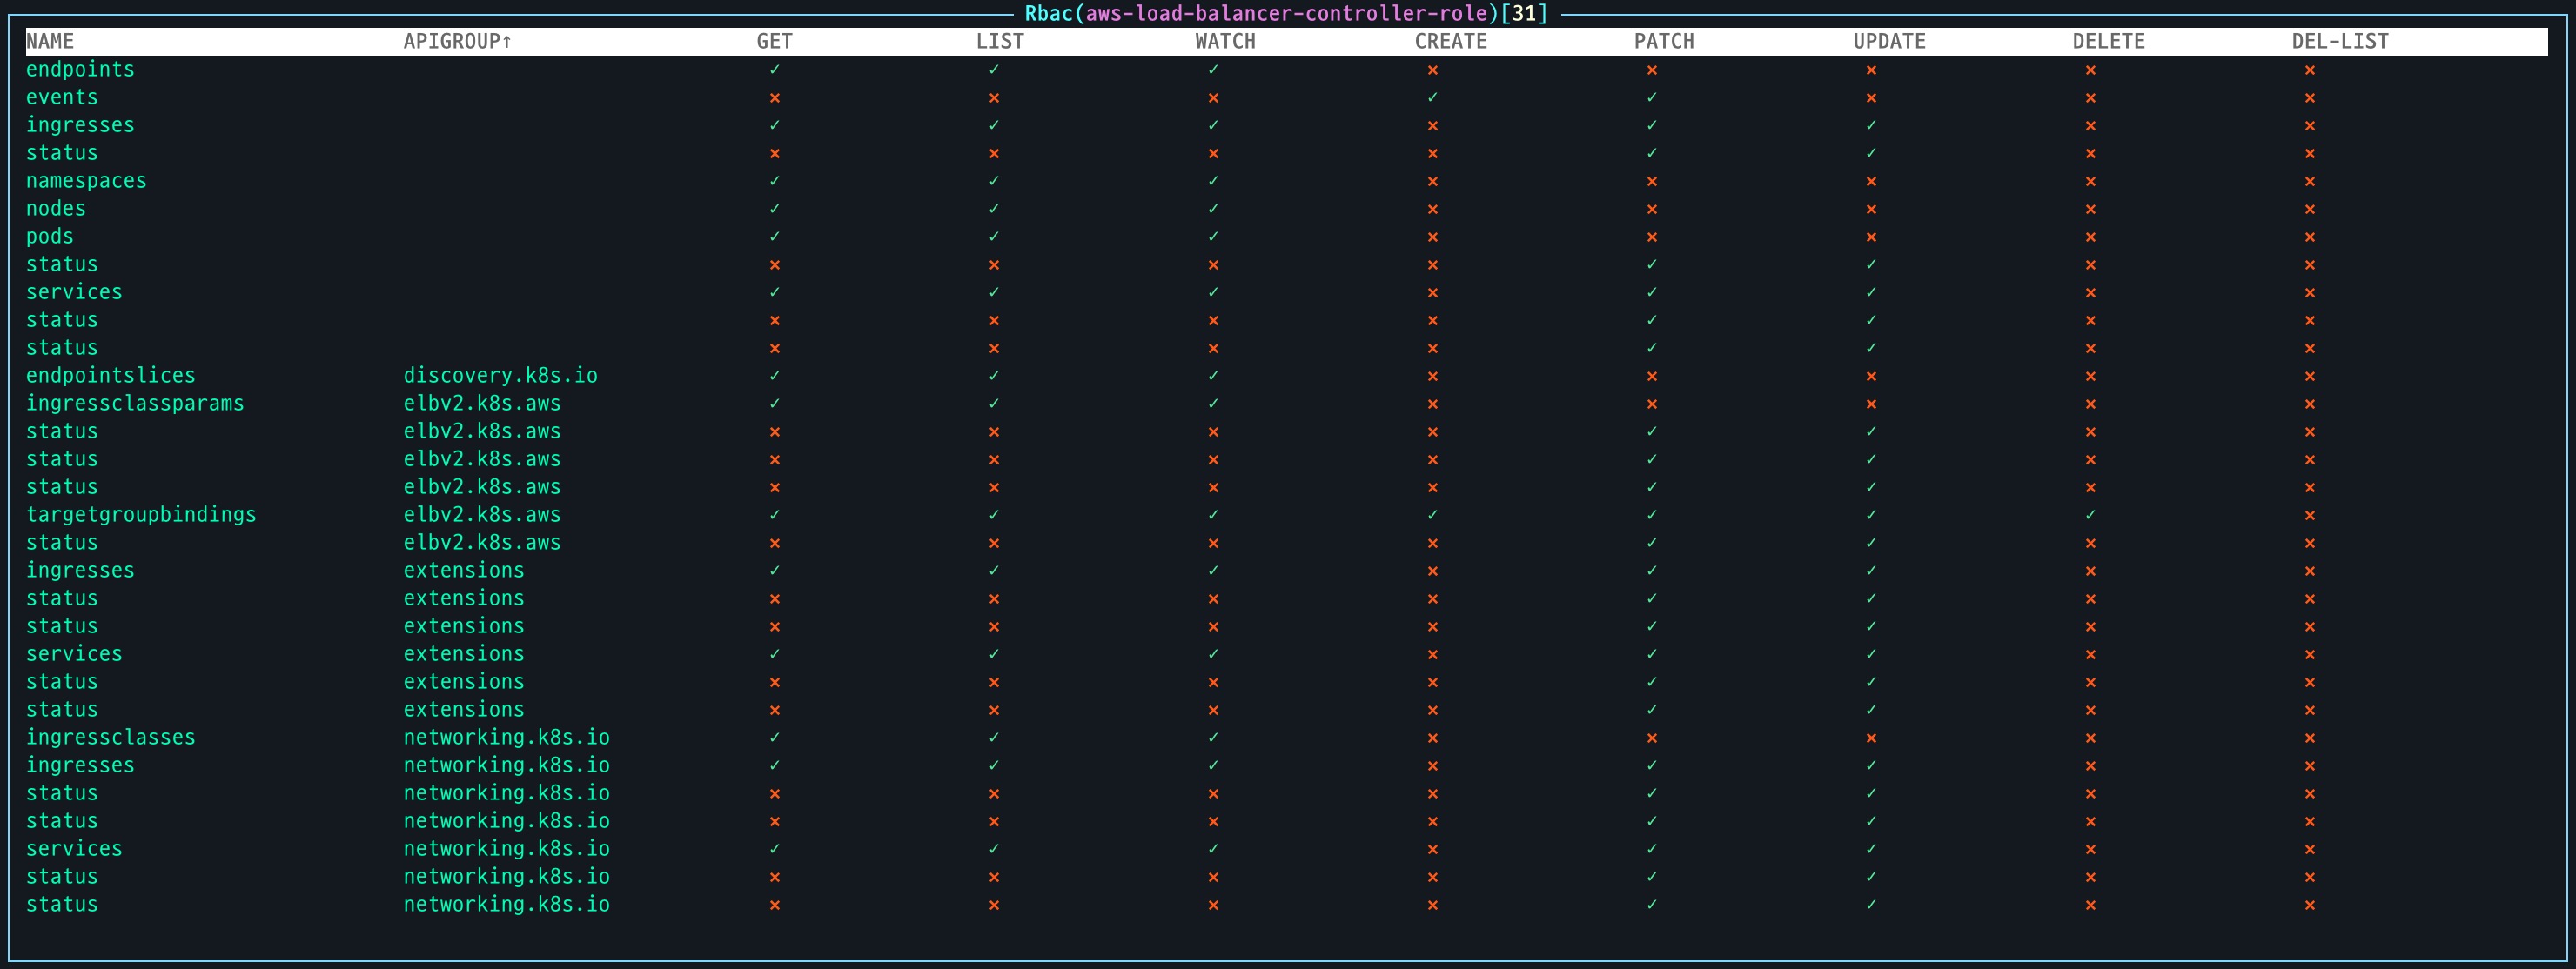
- 생성된 ClusterRole 확인
AWS LoadBalancer Controller가 동작하기 위해 필요한 SA를 생성 후 연결된 ClusterRole과 ClusterRoleBinding을 화인
샘플 애플리케이션 테스트
LoadBalancer 타입의 서비스와 및 파드를 배포하고 NLB 모드에 따라서 Client IP가 어떻게 확인되는지 확인해본다.
# 모니터링
watch -d kubectl get pod,svc,ep

# 작업용 EC2 - 디플로이먼트 & 서비스 생성
curl -s -O https://raw.githubusercontent.com/gasida/PKOS/main/2/echo-service-nlb.yaml
cat echo-service-nlb.yaml | yh
kubectl apply -f echo-service-nlb.yaml

# 파드 로깅 모니터링
kubectl logs -l app=deploy-websrv -f

# 분산 접속 확인
NLB=$(kubectl get svc svc-nlb-ip-type -o jsonpath={.status.loadBalancer.ingress[0].hostname})
curl -s $NLB
- NLB 확인 : Target IP 정보 확인(UI)

NLB에 등록된 Target IP 정보는 생성된 샘플 Pod의 IP인 것을 확인할 수 있다.

이제 NLB를 통해서 Pod를 호출할 경우 Client IP가 어떻게 확인되는지 확인해보자.
- Client IP 확인 결과
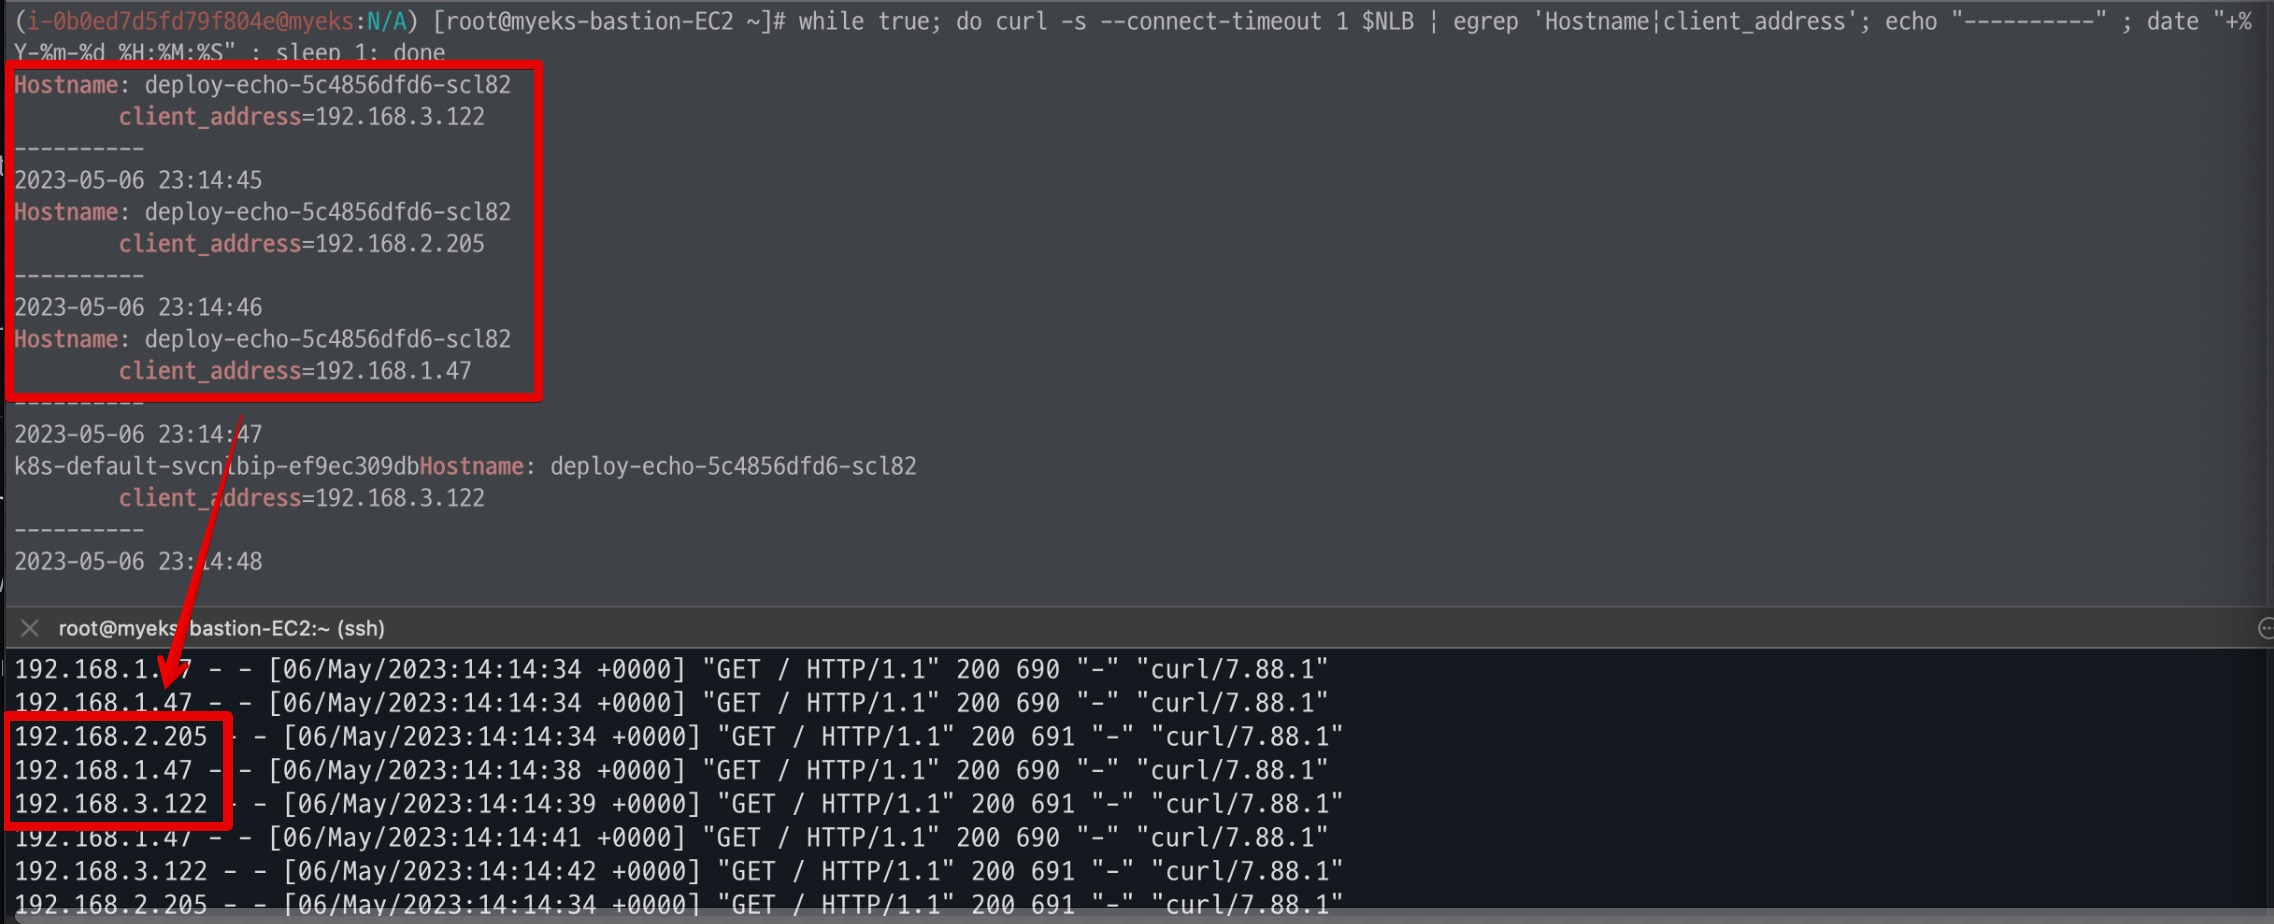
다음 정보는 각 Node의 정보가 아닌 다른 IP 정보가 확인된다.
- 각 Node의 IP 정보 확인

그렇다면 Client IP의 정체는? 바로 NLB에 할당된 네트워크 인터페이스의 IP 이다.

이제 실제로 Client IP를 추적하기 위한 방법을 알아본다.
NLB IP Target & Proxy Protocol v2 활성화
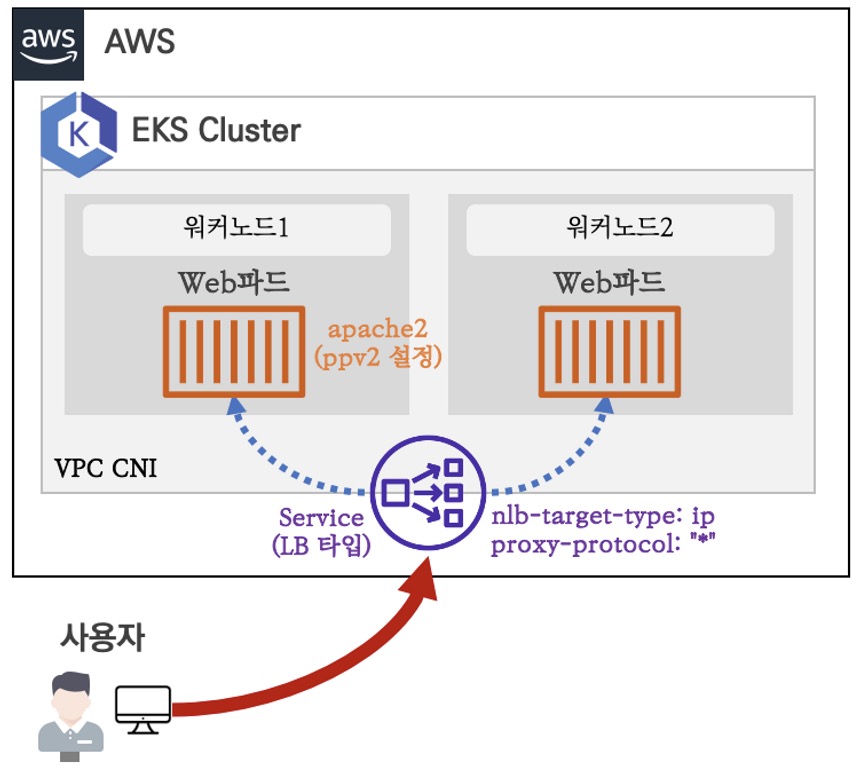
앞선 실습에서 NLB로 SNAT되어서Client IP 확인되지 못하는 것을 확인하였다. 이번에는 Proxy Protocol v2을 활성화 하여 IP 정보를 유지하는 방법을 알아본다. (이미지 출처 : 가시다님 스터디)
- 샘플코드 배포
이때 중요한 부분은 SVC 생성 시 service.beta.kubernetes.io/aws-load-balancer-proxy-protocol: "*" 어노테이션을 활성화 하는 것이다.
# 생성
cat <<EOF | kubectl create -f -
apiVersion: apps/v1
kind: Deployment
metadata:
  name: gasida-web
spec:
  replicas: 1
  selector:
    matchLabels:
      app: gasida-web
  template:
    metadata:
      labels:
        app: gasida-web
    spec:
      terminationGracePeriodSeconds: 0
      containers:
      - name: gasida-web
        image: gasida/httpd:pp
        ports:
        - containerPort: 80
---
apiVersion: v1
kind: Service
metadata:
  name: svc-nlb-ip-type-pp
  annotations:
    service.beta.kubernetes.io/aws-load-balancer-nlb-target-type: ip
    service.beta.kubernetes.io/aws-load-balancer-scheme: internet-facing
    service.beta.kubernetes.io/aws-load-balancer-cross-zone-load-balancing-enabled: "true"
    service.beta.kubernetes.io/aws-load-balancer-proxy-protocol: "*"
spec:
  ports:
    - port: 80
      targetPort: 80
      protocol: TCP
  type: LoadBalancer
  loadBalancerClass: service.k8s.aws/nlb
  selector:
    app: gasida-web
EOF

---

# apache에 proxy protocol 활성화 확인
kubectl exec deploy/gasida-web -- apachectl -t -D DUMP_MODULES
kubectl exec deploy/gasida-web -- cat /usr/local/apache2/conf/httpd.conf

# 접속 확인
NLB=$(kubectl get svc svc-nlb-ip-type-pp -o jsonpath={.status.loadBalancer.ingress[0].hostname})
curl -s $NLB

# 지속적인 접속 시도
while true; do curl -s --connect-timeout 1 $NLB; echo "----------" ; date "+%Y-%m-%d %H:%M:%S" ; sleep 1; done

# 로그 확인
kubectl logs -l app=gasida-web -f
- Client IP 확인
IP를 확인해본 결과 동일한 공인 IP로 찍히는 것으로 확인된다.
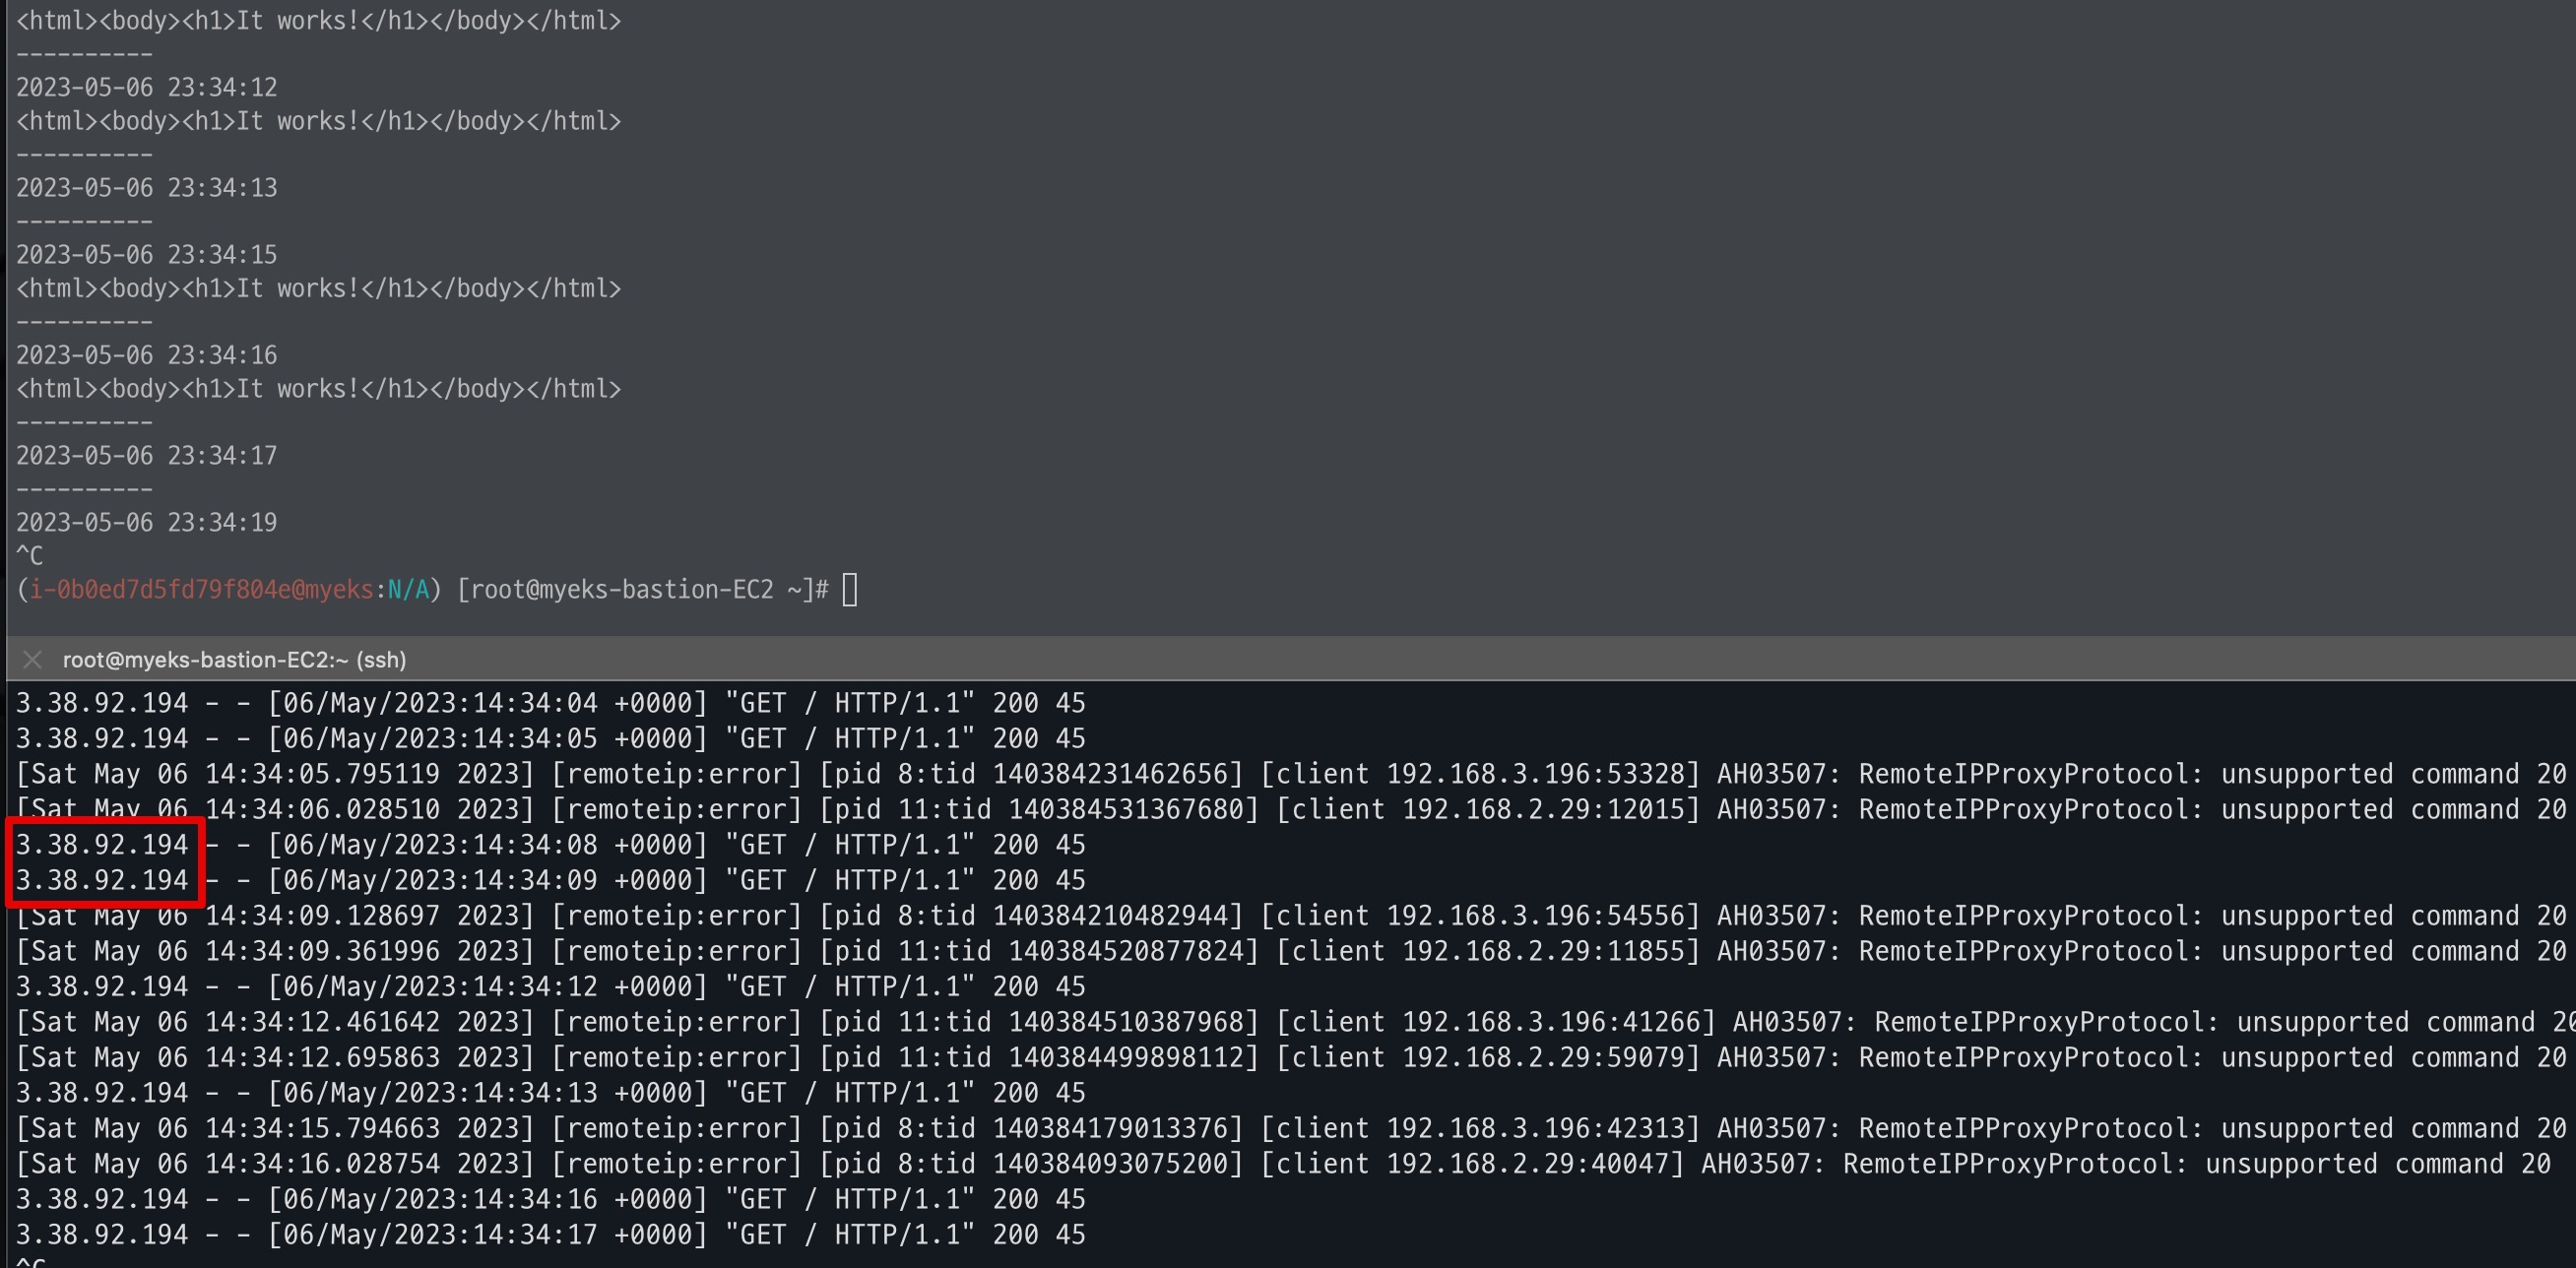
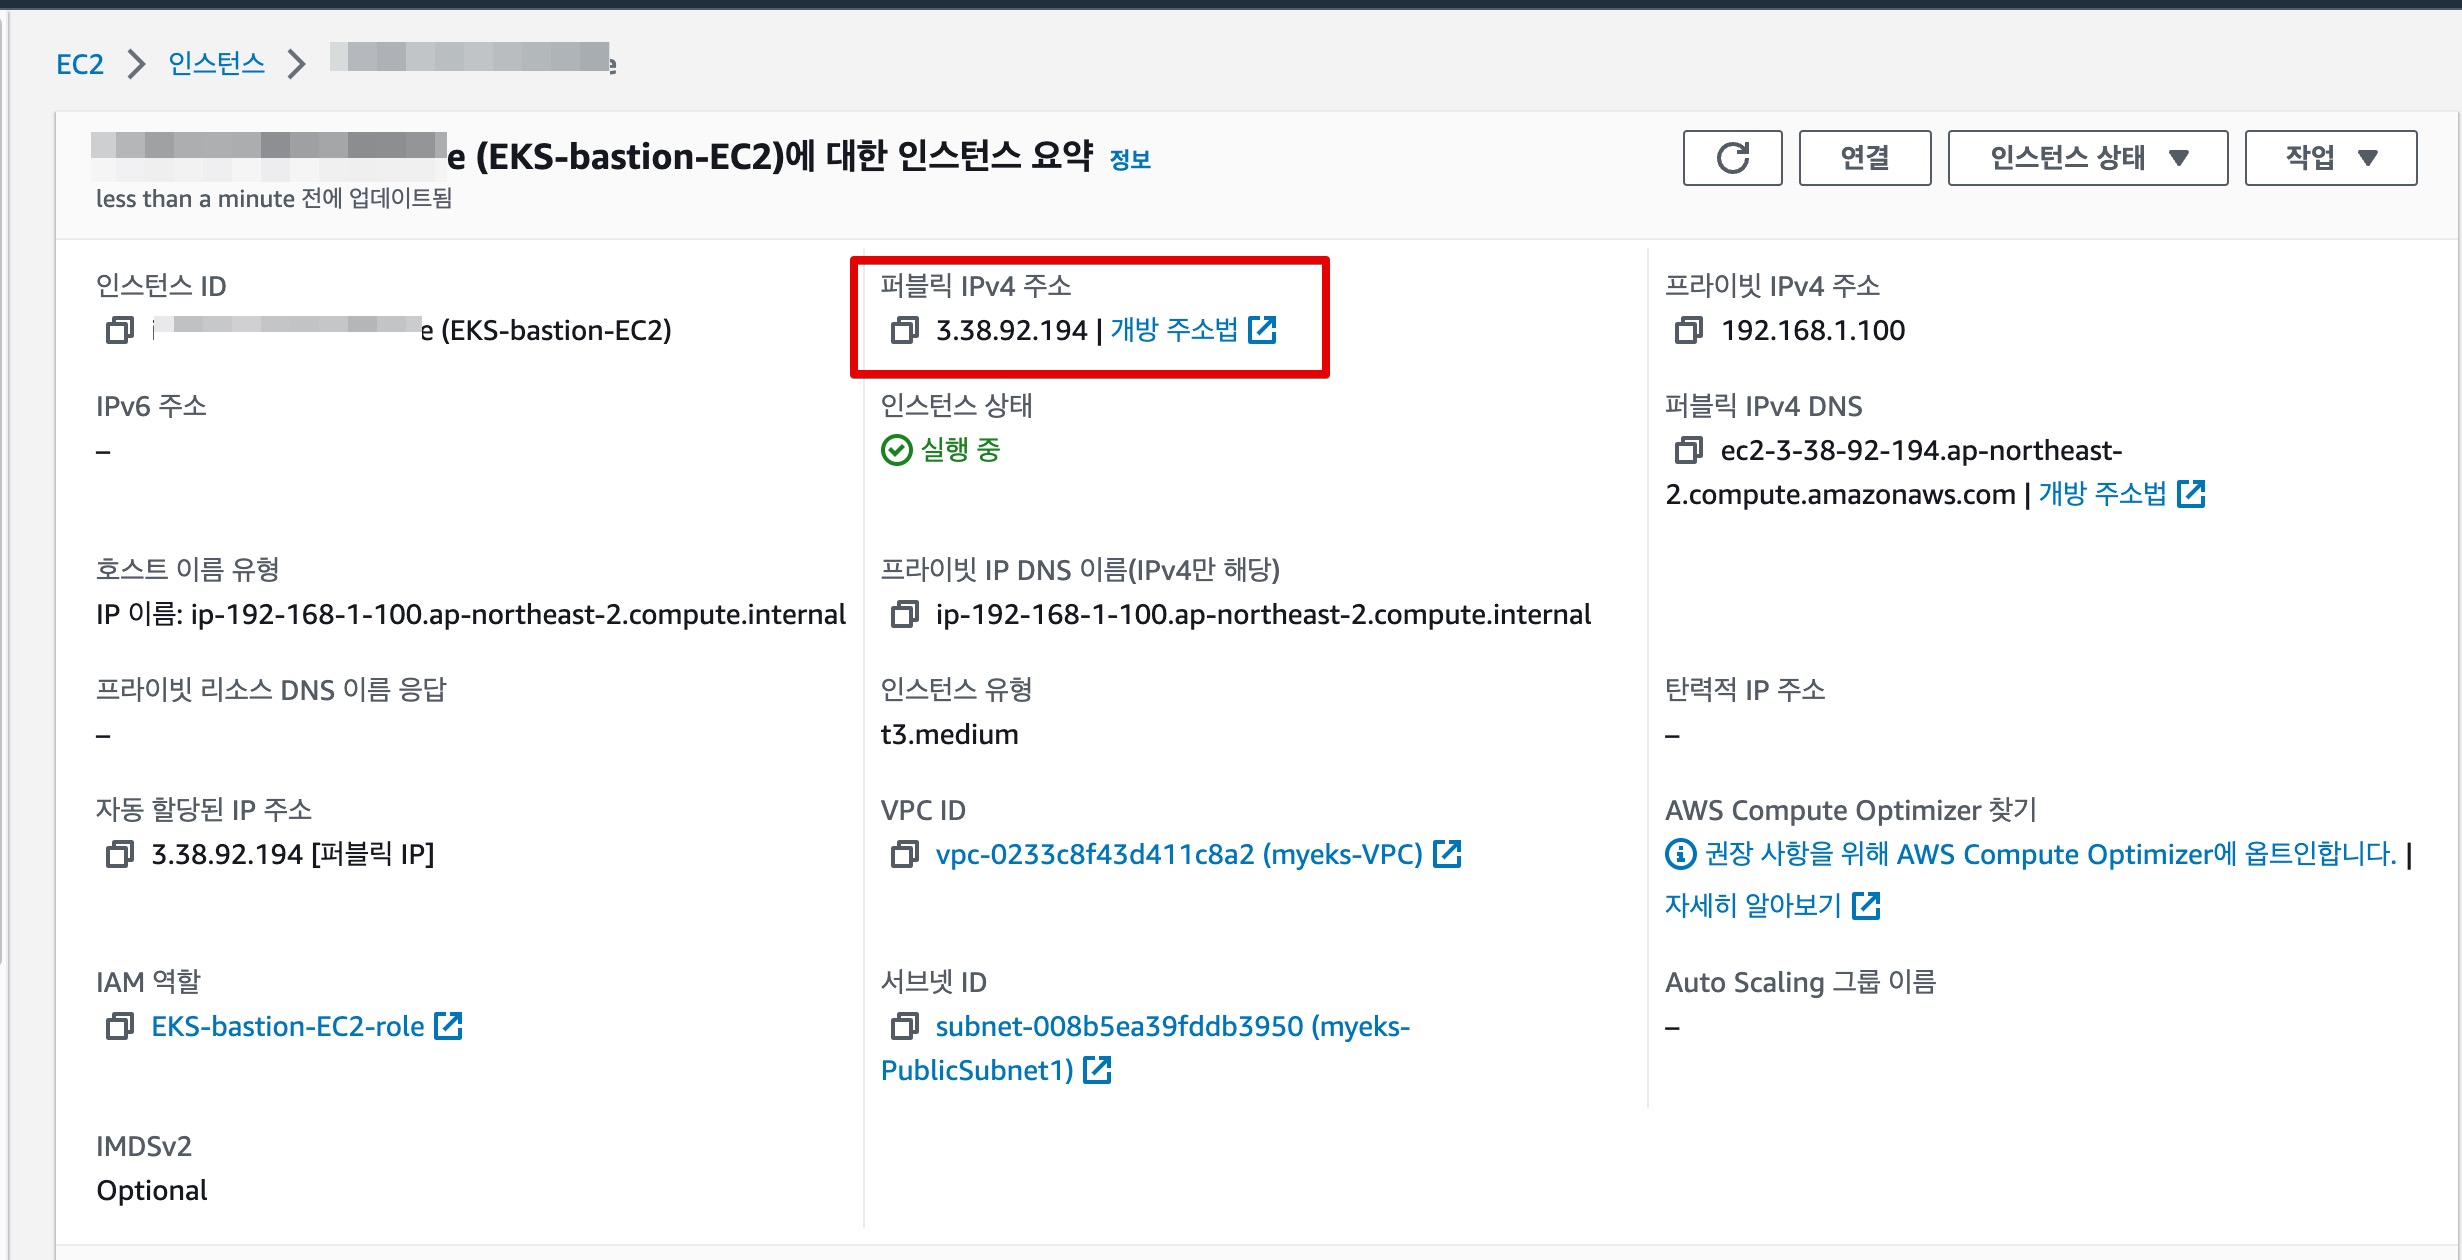
그렇다면 해당 IP는 무엇일까? 바로 현재 curl -s 명령을 수행한 Bastion 노드의 정보이다.
이렇게 NLB를 통해 호출하더라도 정상적으로 Client IP를 유지하는 방법을 알아보았다. 실제로 온프레미스 환경에서 3-Tier 기반의 WEB/WAS를 구성하다 보면 Client IP를 유지하기 위해 XFF 설정을 하는 것이 일반적이다. 다만, NLB의 경우에는 L4 계층까지만 패킷에 대한 이해와 분석이 가능하므로 Proxy Protocol을 써야한다는 새로운 정보를 알 수 있는 좋은 기회였다.
4. Consul IngressGateway 샘플예제
다음 예제는 Consul IngressGateway를 통한 ServiceMesh의 단일 진입점을 테스트해볼 예정이다. Consul 1.15x 버전에는 Envoy의 Access Log 기능이 추가되어 이번 스터디를 통해 학습한 NLB의 IP 유지방안에 대한 테스트를 진행해본다.
참고 : Consul Gateway에서 envoy access log 활성화 기능
실습1. NLB IP Target & Proxy Protocol v2 비활성화
1) Consul deploy via Helm
- Consul Chart YAML
처음 설정시에는 PPv2를 사용하지 않고 NLB를 적용해볼 예정이다. => Client IP가 어떻게 찍히는지 확인!
client:
  grpc: true
connectInject:
  consulNamespaces:
    mirroringK8S: true
  enabled: true
controller:
  enabled: true
global:
  acls:
    manageSystemACLs: true
  enableConsulNamespaces: true
  enterpriseLicense:
    secretKey: key
    secretName: license
  gossipEncryption:
    autoGenerate: true
  image: hashicorp/consul-enterprise:1.15.1-ent
  #imageEnvoy: envoyproxy/envoy:v1.22.5
  #imageK8S: hashicorp/consul-k8s-control-plane:0.49.5
  metrics:
    enabled: false
  tls:
    enableAutoEncrypt: true
    enabled: true
    httpsOnly: false
    verify: false
ingressGateways:
  defaults:
    replicas: 1
    service:
      type: LoadBalancer
      annotations: |
        service.beta.kubernetes.io/aws-load-balancer-nlb-target-type: ip
        service.beta.kubernetes.io/aws-load-balancer-scheme: internet-facing
        service.beta.kubernetes.io/aws-load-balancer-cross-zone-load-balancing-enabled: "true"
        #service.beta.kubernetes.io/aws-load-balancer-healthcheck-port: "8080"
  enabled: true
  gateways:
  - name: ingress-gateway
meshGateway:
  enabled: false
  replicas: 1
  service:
    enabled: true
    nodePort: 32000
    type: NodePort
server:
  replicas: 3
terminatingGateways:
  defaults:
    replicas: 1
  enabled: false
ui:
  enabled: true
  service:
    port:
      http: 80
      https: 443
    type: LoadBalancer
2) Consul CRD 배포
- IngressGateway
apiVersion: consul.hashicorp.com/v1alpha1
kind: IngressGateway
metadata:
  name: ingress-gateway
spec:
  listeners:
    - port: 8080
      protocol: http
      services:
        - name: static-server
- ProxyDefaults
spec.accessLogs를 통해 AccessLog 활성화 및 파일경로 추가
apiVersion: consul.hashicorp.com/v1alpha1
kind: ProxyDefaults
metadata:
  name: global
spec:
  accessLogs:
    enabled: true
#    type: file
#    path: "/var/log/envoy/access-logs.txt"
- ServiceDefaults
apiVersion: consul.hashicorp.com/v1alpha1
kind: ServiceDefaults
metadata:
  name: static-server
spec:
  protocol: http
- ServiceIntentions
apiVersion: consul.hashicorp.com/v1alpha1
kind: ServiceIntentions
metadata:
  name: static-server
spec:
  destination:
    name: static-server
  sources:
    - name: ingress-gateway
      action: allow
- 샘플 SVC/Deploy : static-server
apiVersion: v1
kind: Service
metadata:
  name: static-server
spec:
  selector:
    app: static-server
  ports:
    - protocol: TCP
      port: 80
      targetPort: 8080
---
apiVersion: v1
kind: ServiceAccount
metadata:
  name: static-server
---
apiVersion: apps/v1
kind: Deployment
metadata:
  name: static-server
spec:
  replicas: 1
  selector:
    matchLabels:
      app: static-server
  template:
    metadata:
      name: static-server
      labels:
        app: static-server
      annotations:
        'consul.hashicorp.com/connect-inject': 'true'
    spec:
      containers:
        - name: static-server
          image: hashicorp/http-echo:latest
          args:
            - -text="hello world"
            - -listen=:8080
          ports:
            - containerPort: 8080
              name: http
      serviceAccountName: static-server
3) 샘플 애플리케이션 호출
- IngressGateway에 연결된 NLB 주소로 호출
EXTERNAL_IP=$(kubectl get services --selector component=ingress-gateway --output jsonpath="{range .items[*]}{@.status.loadBalancer.ingress[*].hostname}{end}")
echo "Connecting to \"$EXTERNAL_IP\""
curl --header "Host: static-server.ingress.consul" "http://$EXTERNAL_IP:8080"
호출결과 앞서 실습에서 확인해본 것과 동일하게 NLB IP Target & Proxy Protocol v2 비활성화 일 경우에는 로드밸런서 인터페이스 IP가 확인된다.
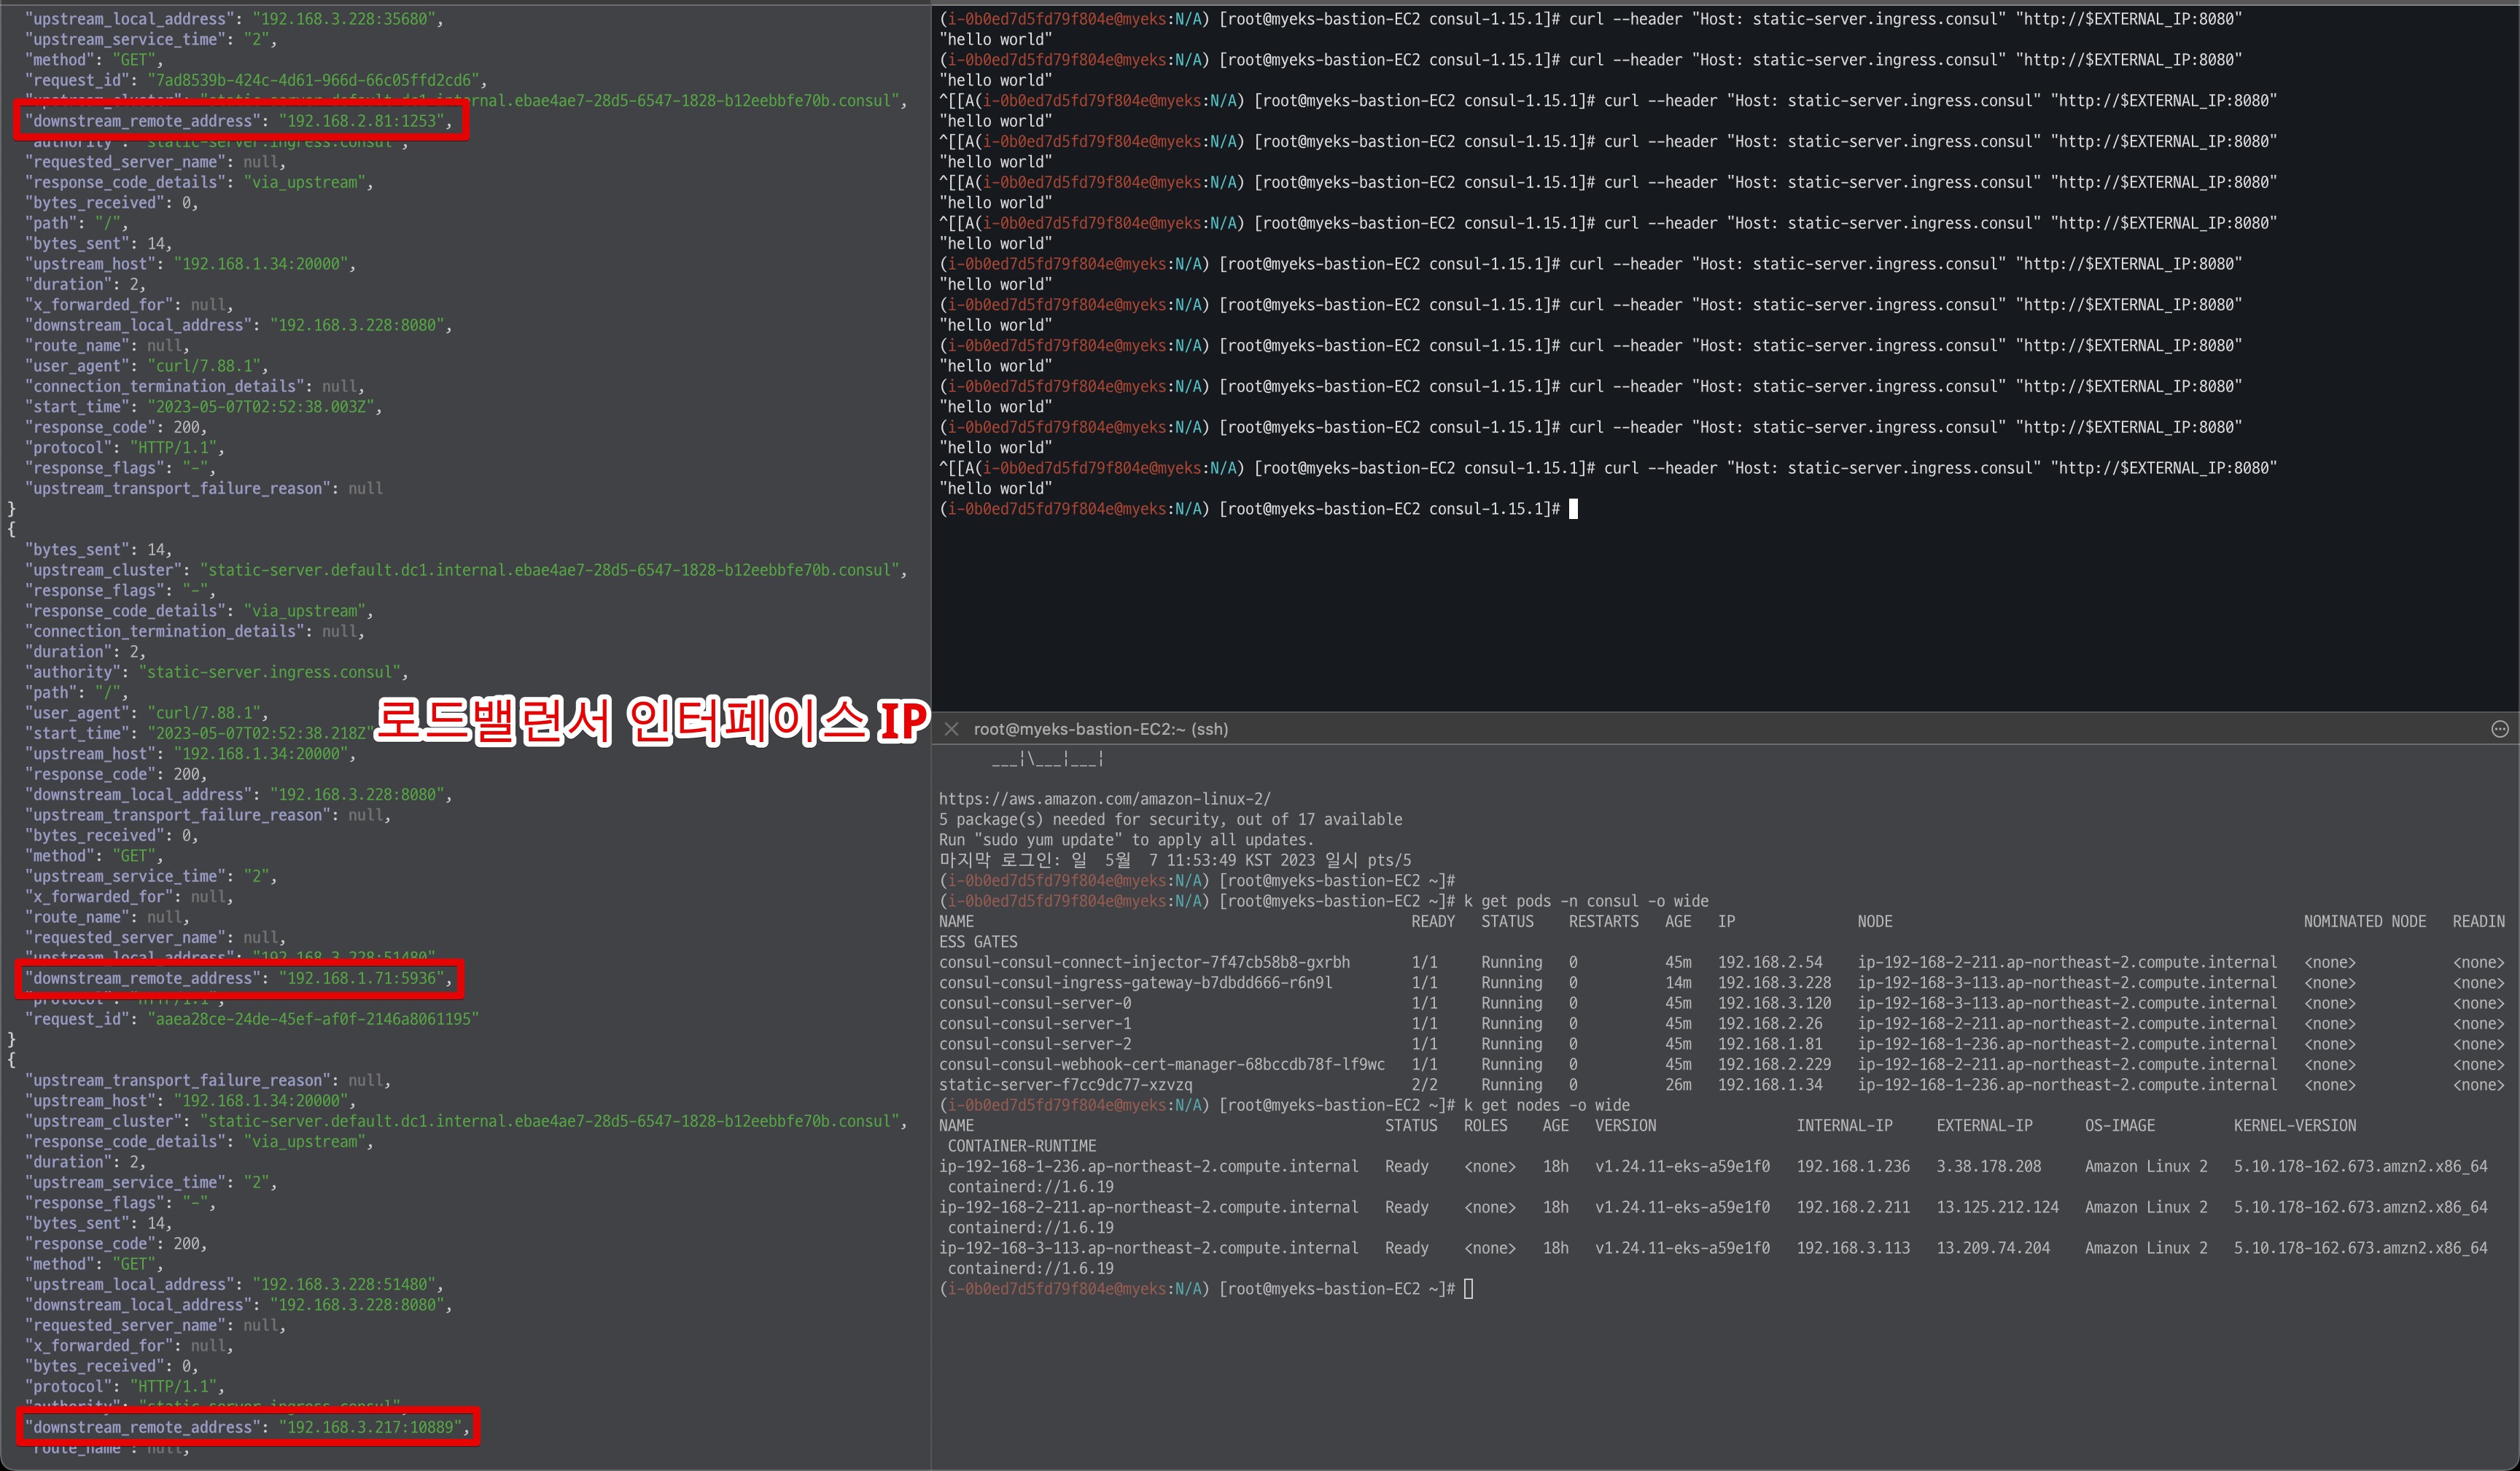
- NLB 인터페이스 IP

실습2. NLB IP Target & Proxy Protocol v2 활성화
1) Consul deploy via Helm
이번에는 위와 동일하지만 NLB의 어노테이션만 PPv2를 활성화 한다.
service.beta.kubernetes.io/aws-load-balancer-proxy-protocol: "*"
#(생략)
ingressGateways:
  defaults:
    replicas: 1
    service:
      type: LoadBalancer
      annotations: |
        service.beta.kubernetes.io/aws-load-balancer-nlb-target-type: ip
        service.beta.kubernetes.io/aws-load-balancer-scheme: internet-facing
        service.beta.kubernetes.io/aws-load-balancer-cross-zone-load-balancing-enabled: "true"
		    service.beta.kubernetes.io/aws-load-balancer-proxy-protocol: "*"
  enabled: true
  gateways:
  - name: ingress-gateway
#(생략)
2) Consul CRD 배포(생략)
위와 동일하게 사용
3) 샘플 애플리케이션 호출
- IngressGateway에 연결된 NLB 주소로 호출
EXTERNAL_IP=$(kubectl get services --selector component=ingress-gateway --output jsonpath="{range .items[*]}{@.status.loadBalancer.ingress[*].hostname}{end}")
echo "Connecting to \"$EXTERNAL_IP\""
curl --header "Host: static-server.ingress.consul" "http://$EXTERNAL_IP:8080"
하지만 PPv2 설정 후 static-server 앱을 테스트해본 결과 정상적으로 동작하지 않는 것으로 보인다.

위와 관련해서 확인해본 결과 Istio의 경우에는 EnvoyFilter 등을 통해 해결하는 방안(?)이 있는 것으로 보이며, 일반적으로 PPv2를 사용하기 위해서는 애플리케이션 단에서 사용할 수 있도록 설정이 필요한 것으로 확인되었다.
참고 :
📌 정보공유:
해당 이슈에 대하여 Consul Product Manager를 통해 FR(Feture Request)로 등록 후 신규 기능으로 추가할 수 있도록 지원할 것으로 답변받았다. 추후 업데이트에 대한 변동사항이 있으면 할 예정이다.
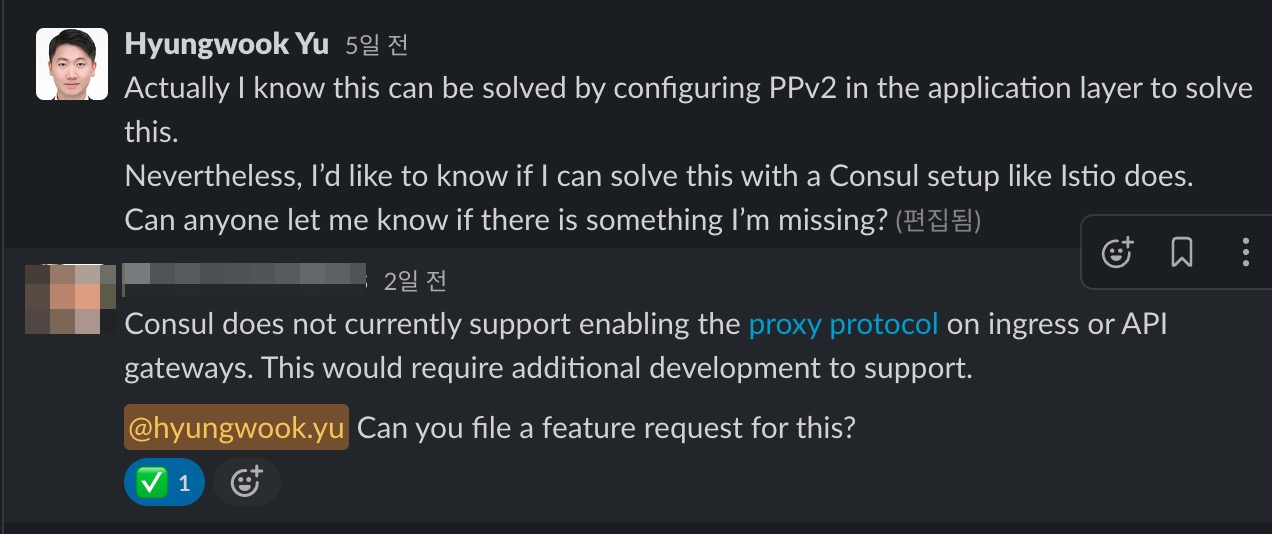
위에서 언급한 것 처럼 Consul Native하게는 PPv2 기능을 사용하기 어려운 상황이라 Apache 애플리케이션에서 PPv2 설정을 통해 해결이 가능한지 확인을 해보았다.
확인결과 결과적으로 테스트가 불가능 한 것으로 확인되었다. Apache 애플리케이션에 PPv2를 활성화 하고 Consul CRD를 적용하여 IngressGateway에서 호출하였으나, 400 에러가 발생한다. (NLB PPv2 활성화 시 발생)
아쉽지만 본 테스트는 FR이 진행된 이후에 업데이트 하도록 하겠다.
