Vault PKI - mTLS demo
Vault PKI - mTLS demo
Demo App Github : https://github.com/Great-Stone/vault-mtls-demo
1. mTLS 설명
1.1 SSL과 TLS
SSL(Secure Sokets Layer, 보안 소캣 계층)는 클라이언트와 서버 사이에 전송된 데이터를 암호화 하고 인터넷 연결에 보안을 유지하는 표준 기술이다. 악의적 외부인이 클라이언트와 서버 사이에 전송되는 정보를 확인 및 탈취하는 것을 방지한다.
TLS(Transport Layer Security, 전송 계층 보안)는 현재 더이상 사용되지 않는 SSL을 계승하는 보다 진보된 보안 기술이다. SSL 3.0을 기반으로 만들어졌지만 호환되지는 않는다. 최신 버전은 TLS 1.3이다.
- TLS 1.2의 경우 암호화 방식과 키 교환 통신이 handshake 과정에 포한되어있어 2회 정도의 추가 요청이 있었다.
- TLS 1.3에서는 handshake과정을 최소화해 암호화 통신하는 방안이 추가되어 HTTPS 통신에 속도와 보안이 개선되었다.
- handshake에 0-RTT 모드 추가
- 정적인 RSA와 Diffie-Hellman Cipher Suite 제거
- handshake 최대한 암호화
- 키 교환과 암호화 방식을 Cipher Suite를 통해 묶어서 정하지 않고 개별적 지정
SSL 기술이 TLS로 대체되었다고 하지만 여전히 브라우저 인증서는 SSL 인증서라고 불린다.
1.2 TLS Handshake
TLS에서는 서버에만 TLS 인증서 및 공개/개인 키 쌍이 있고 클라이언트에는 없다. TLS 프로세스는 다음과 같다.

1.3 mutualTLS(mTLS)
mTLS에서는 클라이언트와 서버 모두에 인증서가 있고 양쪽에서 공개/개인 키 쌍을 사용하여 인증한다. TLS 대비 mTLS는 양쪽을 확인하기 위한 추가 단계가 있다.

1.4 mTLS 의 장단점
먼저 mTLS의 장점을 살펴보면,
- 서버와 클라이언트 간의 상호 인증을 가능하게 하므로, 서버와 클라이언트 모두 신뢰할 수 있는 대상인지 확인할 수 있다. 이를 통해 중간자 공격 및 위조된 인증서와 같은 보안 문제를 방지할 수 있다.
- mTLS는 암호화된 연결을 통해 전송되는 데이터의 안전성을 보장한다. TLS 프로토콜을 사용하므로, 데이터는 암호화되어 전송되며, 중간자 공격 및 도청과 같은 공격으로부터 안전하게 보호된다.
mTLS의 단점은 다음과 같다.
- 연결을 설정하는 과정에서 추가적인 CPU 리소스와 대역폭이 필요할 수 있다. 이는 특히 고사양의 서버에서 큰 부담이 될 수 있다.
- 서버와 클라이언트 모두가 인증서를 발급하고 관리해야 한다는 점이 있다. 인증서를 발급하는 과정은 복잡할 수 있으며, 이를 관리하는 것도 일정한 노력과 비용이 필요합니다.
- mTLS를 구현하는 것은 애플리케이션과 서버 모두에게 추가적인 복잡성을 요구할 수 있다. 이를 위해 애플리케이션과 서버 모두에 대한 추가적인 설정 및 관리가 필요할 수 있다.
1.5 구성의 예
Python - Flask
from flask import Flask, render_template, request, make_response
import ssl

app = Flask(__name__)

### APIs ###

if __name__ == "__main__":
    app.debug = True
    ssl_context = ssl.create_default_context(purpose=ssl.Purpose.CLIENT_AUTH, cafile='ca.crt')
    ssl_context.load_cert_chain(certfile=f'site.crt', keyfile=f'site.key', password='')
    ssl_context.verify_mode = ssl.CERT_REQUIRED
    app.run(host="0.0.0.0", port=src_port, ssl_context=ssl_context, use_reloader=True)
nginx
# default.conf
server {
    listen                  443 ssl;

    access_log /var/log/nginx/access.log;
    error_log /var/log/nginx/error.log;

    ssl_certificate         /etc/ssl/server.crt;
    ssl_certificate_key     /etc/ssl/server.key;
    ssl_protocols           TLSv1.2 TLSv1.3;
    ssl_client_certificate  /etc/nginx/client_certs/ca.crt;
    ssl_verify_client       on;
    ssl_verify_depth        2;

    location / {
        if ($ssl_client_verify != SUCCESS) { return 403; }

        ### 구성 ###
    }
}
Apache HTTPD 2.4
<VirtualHost *:80>
    ServerName {DOMAIN}
    Redirect permanent / https://{DOMAIN}
</VirtualHost>

<IfModule mod_ssl.c>
    <VirtualHost *:443>
        ServerAdmin info@{DOMAIN}
        ServerName {DOMAIN}

        Header always set Strict-Transport-Security "max-age=63072000; includeSubdomains;"

        SSLEngine       on
        SSLCompression      Off
        SSLProtocol         ALL -SSLv2 -SSLv3
        SSLHonorCipherOrder     On
        SSLCipherSuite      EECDH+AESGCM:EDH+AESGCM:AES256+EECDH:AES256+EDH
        SSLCertificateFile  {SSL}/fullchain.pem
        SSLCertificateKeyFile   {SSL}/privkey.pem
        SSLCACertificateFile    {PATH}/ca.crt
        SSLStrictSNIVHostCheck  on

        <Location / >
            SSLVerifyClient     require
            SSLVerifyDepth      1

            Options FollowSymLinks
            AllowOverride None
        </Location>

        <Location /health>
            SSLVerifyClient none
        </Location>

        ProxyPreserveHost On
        ProxyRequests off
        ProxyPass / http://localhost/
        ProxyPassReverse / http://localhost/
    </VirtualHost>
</IfModule>
볼트가 제공하는 PKI 기능과 Agent의 자동 교체 기능을 활용하여 인증서 관리와 발급을 자동화하여 애플리케이션과 서버에 대한 부담을 줄이고 mTLS의 장점을 취할 수 있다.
2. use OpenSSL
- 참고 : https://bitgadak.tistory.com/5
- openssl 대신 smallstep 을 사용하면 좀더 간단하다 : https://smallstep.com/hello-mtls/doc/client/requests
- socket example : https://www.electricmonk.nl/log/2018/06/02/ssl-tls-client-certificate-verification-with-python-v3-4-sslcontext/
OpenSSL을 활용하여 볼트를 사용하지 않고 mTLS를 구현하는 과정을 설명한다.
2.1 Root Key 생성
root ca 생성을 위한 root key를 생성한다.
cd cert
openssl genrsa -out root.key 2048
OS에 따라(Linux/MacOS) 권한 변경이 권장된다.
chmod 600 root.key
2.2 Root CA 요청서(CSR) 생성
생성된 root.key 기반의 root ca 인증서 생성을 위한 요청서를 생성한다.
$ openssl req -config ca.conf -extensions usr_cert -new -key root.key -out ca.csr
-config: 미리 구성해 놓은 ca용 구성 정보를 읽는다.
openssl-xxx.conf sample
| 구분 | 작성 예 |
|---|---|
| Country Name (국가코드) | KR |
| State or Province Name (시/도의 전체이름) | Seoul |
| Locality Name (시/군/구 등의 이름) | Songpa-gu |
| Organization (회사이름) | XXXX |
| Organization Unit (부서명) | Server |
| Common Name (SSL 인증서를 설치할 서버의 Full Domain) | www.xxxx.com |
Check
$ openssl req -text -in ca.csr
Certificate Request:
    Data:
        Version: 0 (0x0)
        Subject: C=KR, ST=Seoul, L=Seoul, O=COMPANY, OU=DEV/emailAddress=example@example.com, CN=example root
        Subject Public Key Info:
            Public Key Algorithm: rsaEncryption
                RSA Public-Key: (2048 bit)
                Modulus:
                    <...생략...>
                Exponent: 65537 (0x10001)
        Attributes:
        Requested Extensions:
            X509v3 Basic Constraints:
                CA:TRUE
    Signature Algorithm: sha256WithRSAEncryption
         <...생략...>
-----BEGIN CERTIFICATE REQUEST-----
<...생략...>
-----END CERTIFICATE REQUEST-----
2.3 Root CA 인증서 생성
생성된 요청서에 대해 자체 서명(self-signning)한다.
openssl x509 -req -days 3650 -in ca.csr -signkey root.key -extfile ca.ext -out ca.crt
-days: 인증서 기간은 10년으로 하였다.-extfile: 서명시 추가 정보에 대한 내용을 읽는다.
Check
$ openssl x509 -text -noout -in ca.crt
Certificate:
    Data:
        Version: 3 (0x2)
        Serial Number:
            ee:38:a2:de:5e:b2:11:c8
    Signature Algorithm: sha256WithRSAEncryption
        Issuer: C=KR, ST=Seoul, L=Seoul, O=COMPANY, OU=DEV/emailAddress=example@example.com, CN=example root
        Validity
            Not Before: Mar 15 03:04:58 2023 GMT
            Not After : Mar 12 03:04:58 2033 GMT
        Subject: C=KR, ST=Seoul, L=Seoul, O=COMPANY, OU=DEV/emailAddress=example@example.com, CN=example root
        Subject Public Key Info:
            Public Key Algorithm: rsaEncryption
                RSA Public-Key: (2048 bit)
                Modulus:
                    <...생략...>
                Exponent: 65537 (0x10001)
        X509v3 extensions:
            X509v3 Basic Constraints:
                CA:TRUE
    Signature Algorithm: sha256WithRSAEncryption
         <...생략...>
생성된 root ca 파일을 시스템에 신뢰할 수 있는 인증서로 등록하면, 브라우저 호출시 신뢰할 수 없는 인증서로 인한 경고 창이 뜨지 않는다.
- MacOS의 경우
ca.crt를 더블클릭하여키체인 접근앱에인증서탭에 등록하고, 등록된example.com인증서를 더블클릭하여신뢰항목에서이 인증서 사용 시를항상 신뢰로 변경한다. - RedHat 계열 OS의 경우
/etc/pki/ca-trust/source/anchors/에 인증서를 복사 한 후,update-ca-trust명령을 실행한다. - Windows의 경우
ca.crt를 더블클릭하여 인증서 창의인증서 설치...를 클릭,인증서 가져오기 마법사로 신뢰할 수 있는 인증서로 등록한다.
2.4 서비스 A 용 Key 생성
데모 서비스 A용 인증서를 생성하기 위해 해당 인증서를 위한 key를 생성한다. 생성 시 패스워드를 넣어주며, 패스워드 없는 key를 생성하려는 경우 한번더 풀어주는 과정이 필요하다.
# 패스워드 4자리 이상 입력
openssl genrsa -aes256 -out service-a-with-pw.key 2048
# 패스워드 없는 key
openssl rsa -in service-a-with-pw.key -out service-a.key
2.5 서비스 A 용 인증서 요청서(CSR) 생성
서비스 A용 인증서를 위한 요청서를 생성한다.
openssl req -new -key service-a.key -config service-a.conf -out service-a.csr
-config: 미리 구성해 놓은 서비스 A용 구성 정보를 읽는다.
2.6 서비스용 인증서 생성
자체 서명과정에서 앞서 생성한 root ca 인증서와 key를 넣어 서비스 A인증서가 root ca에 종속되도록 구성한다.
openssl x509 -req -days 365 -in service-a.csr -extfile service-a.ext -CA ca.crt -CAkey root.key -CAcreateserial -out service-a.crt
$ openssl x509 -text -in service-a.crt
Certificate:
    Data:
        Version: 3 (0x2)
        Serial Number:
            ec:71:b0:dd:72:c2:a2:4a
    Signature Algorithm: sha256WithRSAEncryption
        Issuer: C=KR, ST=Seoul, L=Seoul, O=COMPANY, OU=DEV/emailAddress=example@example.com, CN=example root
        Validity
            Not Before: Mar 15 03:36:06 2023 GMT
            Not After : Mar 14 03:36:06 2024 GMT
        Subject: C=KR, ST=Seoul, L=Seoul, O=COMPANY, OU=DEV/emailAddress=example@example.com, CN=service-a.example.com
        Subject Public Key Info:
            Public Key Algorithm: rsaEncryption
                RSA Public-Key: (2048 bit)
                Modulus:
                    <..생략..>
                Exponent: 65537 (0x10001)
        X509v3 extensions:
            X509v3 Subject Alternative Name:
                DNS:service-a.example.com
    Signature Algorithm: sha256WithRSAEncryption
         <..생략..>
-----BEGIN CERTIFICATE-----
<..생략..>
-----END CERTIFICATE-----
-days: 인증서 기간을 1년으로 하였다.-CA: root ca 인증서를 지정한다.-CAkey: root ca의 key를 지정한다.-CAcreateserial: 서명 작업에 root ca가 인증서에 대한 일련번호 생성-extfile: 서비스 A를 위한 추가 정보
2.7 Service B용 생성
서비스 B에 대한 인증서도 생성한다. 앞서 설명된 내용을 생략하고 아래 커맨드만 나열한다.
openssl genrsa -aes256 -out service-b-with-pw.key 2048

openssl rsa -in service-b-with-pw.key -out service-b.key

openssl req -new -key service-b.key -config service-b.conf -out service-b.csr

openssl x509 -req -days 365 -in service-b.csr -extfile service-b.ext -CA ca.crt -CAkey root.key -CAcreateserial -out service-b.crt
3. Demo App (Python)
데모 앱은 Python으로 구성되었다.
3.1 preparation
Python
$ python --version
Python 3.10.5

$ pip --version
pip 23.0.1

$ pip install requests flask
System : hosts
127.0.0.1 service-a.example.com service-b.example.com
3.2 Run services
Service A
cd python_service_a
python main.py
Service B
cd python_service_b
python main.py
3.3 Test API
Check curl - Service A
Python으로 작성된 flask api server 구성은 다음과 같다.
# main.py

### 생략 ###
if __name__ == "__main__":
    app.debug = True
    ssl_context = ssl.create_default_context(purpose=ssl.Purpose.CLIENT_AUTH, cafile='../cert/ca.crt')
    ssl_context.load_cert_chain(certfile=f'../cert/{src}.crt', keyfile=f'../cert/{src}.key', password='')
    # ssl_context.verify_mode = ssl.CERT_REQUIRED
    app.run(host="0.0.0.0", port=src_port, ssl_context=ssl_context, use_reloader=True, extra_files=[f'../cert/{src}.crt'])
ssl.create_default_context: flask에서 사용할 ssl context를 정의한다. 여기cafile에 root ca 파일을 지정한다.ssl_context.load_cert_chain: cert와 key를 지정하여 인증서 체인을 설정한다.ssl_context.verify_mode: service A는 인증서 검증을 무시할 수 있도록 해당 옵션에 주석처리 한다.app.run(..., extra_files=[f'../cert/{src}.crt']): 인증서가 변경되면 flask를 다시 시작하도록 구성한다.
서비스 A의 경우 https로 접근할 수 있고, ssl.CERT_REQUIRED 옵션이 활성화 되어있지 않아 신뢰할 수 없는 인증서라도 curl로 --insecure 옵션을 추가하여 응답을 확인할 수 있다. 브라우저에서도 별도의 신뢰 확인을 통해 접근가능하다.
$ curl https://service-a.example.com:7443

curl: (60) SSL certificate problem: self signed certificate in certificate chain
More details here: https://curl.se/docs/sslcerts.html

curl failed to verify the legitimacy of the server and therefore could not
establish a secure connection to it. To learn more about this situation and
how to fix it, please visit the web page mentioned above.
$ curl --insecure https://service-a.example.com:7443

Hello from "service-a"%
Check Curl - Service B
Python으로 작성된 flask api server 구성은 다음과 같다.
# main.py

### 생략 ###
if __name__ == "__main__":
    app.debug = True
    ssl_context = ssl.create_default_context(purpose=ssl.Purpose.CLIENT_AUTH, cafile='../cert/ca.crt')
    ssl_context.load_cert_chain(certfile=f'../cert/{src}.crt', keyfile=f'../cert/{src}.key', password='')
    ssl_context.verify_mode = ssl.CERT_REQUIRED
    app.run(host="0.0.0.0", port=src_port, ssl_context=ssl_context, use_reloader=True, extra_files=[f'../cert/{src}.crt'])
ssl_context.verify_mode = ssl.CERT_REQUIRED설정으로 인해 인증서 검증이 반드시 필요하도록 설정한다.
--insecure 옵션을 추가하더라도 서비스 B는 인증서를 요구한다.
$ curl --insecure https://service-b.example.com:8443
curl: (56) LibreSSL SSL_read: error:1404C45C:SSL routines:ST_OK:reason(1116), errno 0
따라서 요청시 root ca, cert(인증서), key를 함께 사용해야 한다.
$ curl --cacert ca.crt --key service-b.key --cert service-b.crt https://service-b.example.com:8443
Normal mTLS Check
서비스 A에서 B로 요청할 때 인증서 모두를 설정한 경우이다. 응답이 정상적으로 오는지 확인한다.
https://service-a.example.com:7443/w-mtls
Without Cert
서비스 A에서 B로 요청할 때 A의 인증정보를 담지 않은 경우이다. 서비스 B에서 인증서를 요구하는 메시지가 출력된다.
https://service-a.example.com:7443/wo-cert-mtls
# 응답
SSLError(1, '[SSL: TLSV13_ALERT_CERTIFICATE_REQUIRED] tlsv13 alert certificate required')
Without CA
서비스 A에서 B로 요청할 때 root ca를 포함하지 않는 경우이다. 인증을 위한 자체 서명 인증서를 요구한다.
https://service-a.example.com:7443/wo-ca-mtls
# 응답
SSLError(SSLCertVerificationError(1, '[SSL: CERTIFICATE_VERIFY_FAILED] certificate verify failed: self signed certificate in certificate chain')
With 'Expired' Cert - Service A
faketime : https://github.com/wolfcw/libfaketime
faketime을 사용하여 서비스 A의 인증서 만료 기간을 현재시간 이전으로 만든다.
faketime '2023-01-01 00:00:00' /bin/bash -c 'openssl x509 -req -days 30 -in service-a.csr -extfile service-a.ext -CA ca.crt -CAkey root.key -CAcreateserial -out service-a.crt'
서비스 A가 보유한 인증서가 만료된 경우 인증서 만료됨을 표기한다. (서비스 B 인증서는 정상)
https://service-a.example.com:7443/w-mtls
# 응답
SSLError(SSLError(1, '[SSL: SSLV3_ALERT_CERTIFICATE_EXPIRED] sslv3 alert certificate expired')
With 'Expired' Cert - Service B
faketime : https://github.com/wolfcw/libfaketime
faketime을 사용하여 서비스 B의 인증서 만료 기간을 현재시간 이전으로 만든다.
faketime '2023-01-01 00:00:00' /bin/bash -c 'openssl x509 -req -days 30 -in service-b.csr -extfile service-b.ext -CA ca.crt -CAkey root.key -CAcreateserial -out service-b.crt'
서비스 B가 보유한 인증서가 만료된 경우 인증서 만료됨을 표기한다. (서비스 A 인증서는 정상)
https://service-a.example.com:7443/w-mtls
SSLError(SSLCertVerificationError(1, '[SSL: CERTIFICATE_VERIFY_FAILED] certificate verify failed: certificate has expired')
With 'Different' Cert - Service A & B
A와 B의 인증서 Root CA가 다른 경우 인증서 서명이 다르므로 요청 실패한다. 아래와 같이 서비스 B를 위한 인증서를 root ca부터 새로 생성한다.
cd cert

openssl genrsa -out root-b.key 2048

chmod 600 root-b.key

openssl req -config ca.conf -extensions usr_cert -new -key root-b.key -out ca-b.csr

openssl x509 -req -days 3650 -in ca-b.csr -signkey root-b.key -extfile ca-b.ext -out ca-b.crt

openssl genrsa -aes256 -out service-b-with-pw.key 2048

openssl rsa -in service-b-with-pw.key -out service-b.key

openssl req -new -key service-b.key -config service-b.conf -out service-b.csr

openssl x509 -req -days 365 -in service-b.csr -extfile service-b.ext -CA ca-b.crt -CAkey root-b.key -CAcreateserial -out service-b.crt
python_service_b의 main.py에 서 ca 파일 이름을 변경한다.
if __name__ == "__main__":
    app.debug = True
    ssl_context = ssl.create_default_context(purpose=ssl.Purpose.CLIENT_AUTH, cafile='../cert/ca-b.crt')
    ssl_context.load_cert_chain(certfile=f'../cert/{src}.crt', keyfile=f'../cert/{src}.key', password='')
    ssl_context.verify_mode = ssl.CERT_REQUIRED
    app.run(host="0.0.0.0", port=src_port, ssl_context=ssl_context, use_reloader=True, extra_files=[f'../cert/{src}.crt'])
요청 시 서비스 A와 B의 서명이 달라 오류가 발생함을 확인한다.
https://service-a.example.com:7443/w-mtls
SSLError(SSLCertVerificationError(1, '[SSL: CERTIFICATE_VERIFY_FAILED] certificate verify failed: certificate signature failure')
테스트가 끝났으면 다시 root ca 파일을 원래의 같은 ca.crt 파일로 지정한다.
4. Vault PKI Setup
Vault Download : https://releases.hashicorp.com/vault/
Vault의 인증서 관리 및 자동화 관리 방안을 설명한다.
4.1 Run Vault
vault server -dev -dev-root-token-id=root
4.2 Set env for Vault
export VAULT_ADDR='http://127.0.0.1:8200'
$ vault login

Token (will be hidden): root
4.3 Enable PKI & Setup
PKI 엔진 활성화
vault secrets enable pki
PKI 엔진 TTL tuning
Vault 기본 Max TTL은 32일(786h) 이므로 원하는 TTL로 변경한다.
vault secrets tune -max-lease-ttl=87600h pki
root CA 생성
vault write pki/root/generate/internal \
    key_bits=2048 \
    private_key_format=pem \
    signature_bits=256 \
    country=KR \
    province=Seoul \
    locality=KR \
    organization=COMPANY \
    ou=DEV \
    common_name=example.com \
    ttl=87600h
CRL 생성
Certificate Revocation List(인증서 해지 목록) 엔드포인트 작성
vault write pki/config/urls \
    issuing_certificates="http://127.0.0.1:8200/v1/pki/ca" \
    crl_distribution_points="http://127.0.0.1:8200/v1/pki/crl"
Role 생성
미리 Role을 구성해 놓으면 사용자 및 앱은 지정된 규칙에 따라 인증서를 발급받을 수 있다.
vault write pki/roles/example-dot-com \
    allowed_domains=example.com \
    allow_subdomains=true \
    max_ttl=72h
발급 테스트
vault write pki/issue/example-dot-com \
    common_name=service-a.example.com
4.4 Vault Agent Setup
vault_agent디렉토리에서 작업한다.
Vault Agent는 볼트가 가지고 있는 시크릿 정보를 발급 및 TTL 만료 시 자동 갱신해주는 역할을 수행한다.
Policy 추가
Vault Agent가 취득할 정책을 추가한다. 앞서 생성한 PKI 시크릿 엔진에 대한 권한이 설정되어있다.
$ vault policy write pki pki_policy.hcl
Vault Agent를 위한 approle인증 추가
$ vault auth enable approle
Success! Enabled approle auth method at: approle/

$ vault write auth/approle/role/pki-agent \
    secret_id_ttl=120m \
    token_ttl=60m \
    token_max_tll=120m \
    policies="pki"
Success! Data written to: auth/approle/role/pki-agent

$ vault read auth/approle/role/pki-agent/role-id
Key        Value
---        -----
role_id    dfa2a248-1e1b-e2e9-200c-69c63b9ca447

$ vault write -f auth/approle/role/pki-agent/secret-id
Key                   Value
---                   -----
secret_id             864360c1-c79f-ea7c-727b-7752361fe1ba
secret_id_accessor    3cc068e2-a172-2bb1-c097-b777c3525ba6
Vault Agent가 사용할 RoleID, SecretID 저장
Vault Agent 실행 시 approle 인증방식을 사용하도록 구성하는 예제로, role_id와 secret_id가 필요하다. Vault Agent 재기동시에는 secret_id를 재발급 해야 한다.
$ vault read -field=role_id auth/approle/role/pki-agent/role-id > roleid

$ vault write -f -field=secret_id auth/approle/role/pki-agent/secret-id > secretid
Template 확인
Vault Agent는 Template에 따라 시크릿을 특정 파일로 랜더링하는 기능을 갖고 있다.
# ca-a.tpl
{{- /* ca-a.tpl */ -}}
{{ with secret "pki/issue/example-dot-com" "common_name=service-a.example.com" "ttl=2m" }}
{{ .Data.issuing_ca }}{{ end }}
위 구문은 pki/issue/example-dot-com 에서 common_name=service-a.example.com 인 인증서를 발급하는 것으로, 테스트를 위해 ttl=2m로 짧게 설정하였다. 볼트로 부터 받는 결과 중에서 issuing_ca 값을 랜더링한다.
vault_agent.hcl에서는 위 Template에 대한 랜더링 결과를 특정 파일로 저장하도록 명시한다.
template {
  source      = "ca-a.tpl"
  destination = "../cert/ca.crt"
}
Vault Agent 실행
vault agent -config=vault_agent.hcl -log-level=debug
지정된 TTL 간격마다 템플릿 랜더링 로그 확인한다.
...
2023-03-18T22:29:09.312+0900 [DEBUG] (runner) rendering "ca-a.tpl" => "../cert/ca.crt"
2023-03-18T22:29:09.312+0900 [DEBUG] (runner) checking template a04612e63b9a03a45ef968a8984a23db
2023-03-18T22:29:09.312+0900 [DEBUG] (runner) rendering "cert-a.tpl" => "../cert/service-a.crt"
2023-03-18T22:29:09.312+0900 [DEBUG] (runner) checking template 850589d81f7afe64c7c5a0a8440c8569
2023-03-18T22:29:09.312+0900 [DEBUG] (runner) rendering "key-a.tpl" => "../cert/service-a.key"
2023-03-18T22:29:09.312+0900 [DEBUG] (runner) checking template 60e7f2683d2c76a501eb54879bf89ad2
2023-03-18T22:29:09.312+0900 [DEBUG] (runner) rendering "cert-b.tpl" => "../cert/service-b.crt"
2023-03-18T22:29:09.333+0900 [INFO] (runner) rendered "cert-b.tpl" => "../cert/service-b.crt"
2023-03-18T22:29:09.333+0900 [DEBUG] (runner) checking template 1fb22b9f15857b7eeb0b68a3c9ac6d20
2023-03-18T22:29:09.334+0900 [DEBUG] (runner) rendering "key-b.tpl" => "../cert/service-b.key"
2023-03-18T22:29:09.354+0900 [INFO] (runner) rendered "key-b.tpl" => "../cert/service-b.key"
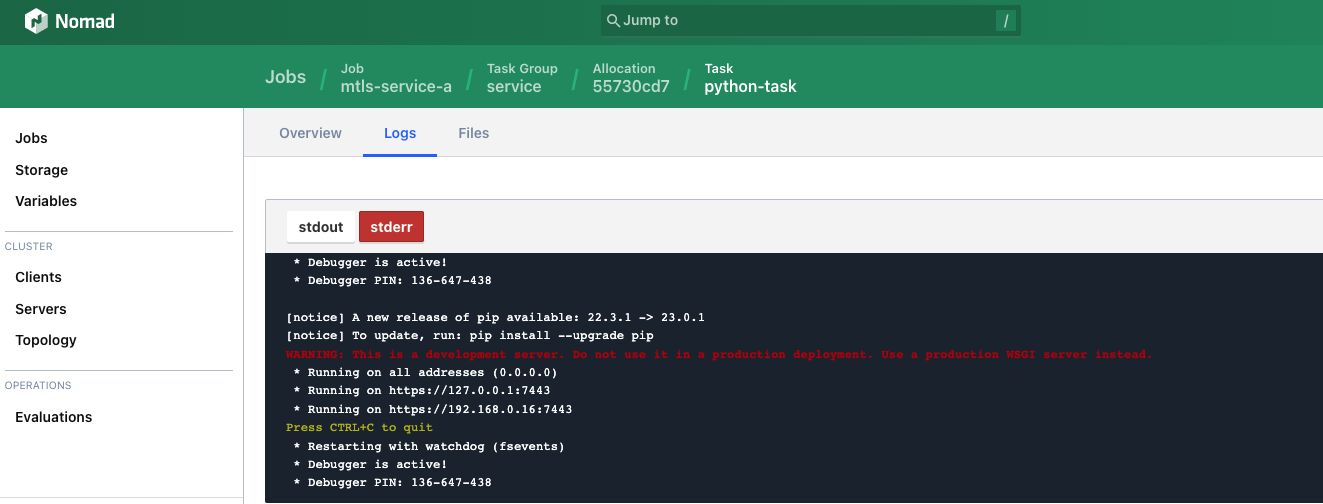
랜더링이 완료되고, 파일이 갱신되면 Python의 Flask 설정의 extra_files 항목이 변경되므로 재시작되어 인증서를 다시 읽어온다.
 * Detected change in '/vault-examples/mtls-pki/cert/130906523', reloading
 * Detected change in '/vault-examples/mtls-pki/cert/service-a.crt', reloading
 * Restarting with watchdog (fsevents)
 * Debugger is active!
 * Debugger PIN: 136-647-438
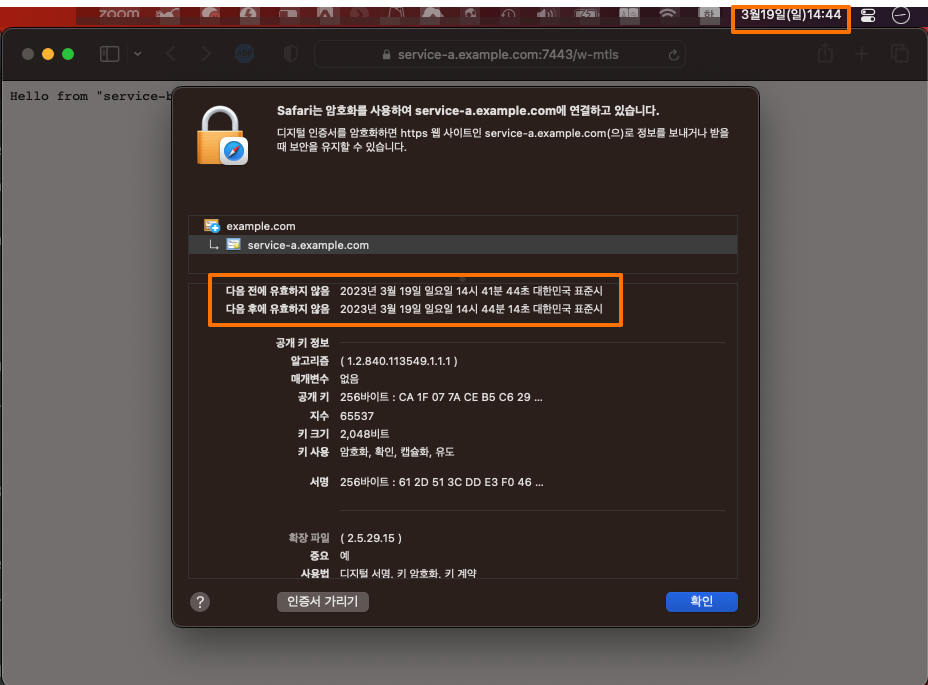
변경된 인증서를 확인해보면 갱신된 유효기간을 확인할 수 있고, 브라우저에서도 인증서 보기를 통해 변경된 인증서의 유효기간을 확인할 수 있다.

5. Nomad 연계
인증서 같은 시크릿은 파일 형태로 관리되는데, 이런 파일이 변경되면 애플리케이션 또는 웹서버나 솔루션에서 감지하는 구성이 필요하다. 데모 앱인 Python의 Flask에서는 Debug모드에 extra_files에 인증서를 지정하여 변경되는 인증서를 감지하도록 하였으나 이는 운영에서는 권장되지 않는 방식이며 인증서 교체와 함께 watch, reload, restart에 대한 동작이 요구된다.
애플리케이션에서 내부적으로 코드 구현을 통해 이를 교체하는 방법도 있으나, mTLS가 적용되는 코드 전반에 변경이 필요하므로 HasihCorp Nomad같은 Vault 연계된 애플리케이션 오케스트레이터를 활용할 수 있다.
Vault의 인증서 관리 및 자동화 관리 방안을 Nomad와 연계하여 설명한다.
Nomad Download : https://releases.hashicorp.com/nomad/
- Vault 서버는 그대로 두고, PKI를 기존것을 사용한다.
- 서비스 A와 B는 종료한다.
- Vault Agent는 종료한다.
준비된 Policy 및 Job은 nomad 디렉토리에 있다.
4.1 Nomad Policy를 Vault에 생성 및 Nomad 실행
Nomad 에 부여할 Vault의 정책을 생성한다.
vault policy write nomad-server nomad_policy.hcl
Nomad 에서 사용할 Token Role을 생성한다. Nomad에서 허용되는 정책은 앞서 생성한 pki 이다.
vault write auth/token/roles/nomad-cluster allowed_policies="pki" disallowed_policies=nomad-server token_explicit_max_ttl=0 orphan=true token_period="259200" renewable=true
생성한 Token Role 기반으로 Nomad와의 설정에 사용할 Token을 하나 발급한다.
vault token create -field token -policy nomad-server -period 72h -orphan > /tmp/token.txt
Nomad를 실행한다.
$ nomad agent -dev -vault-enabled=true -vault-address=http://127.0.0.1:8200 -vault-token=$(cat /tmp/token.txt) -vault-tls-skip-verify=true -vault-create-from-role=nomad-cluster

==> No configuration files loaded
==> Starting Nomad agent...
==> Nomad agent configuration:

       Advertise Addrs: HTTP: 127.0.0.1:4646; RPC: 127.0.0.1:4647; Serf: 127.0.0.1:4648
            Bind Addrs: HTTP: [127.0.0.1:4646]; RPC: 127.0.0.1:4647; Serf: 127.0.0.1:4648
                Client: true
             Log Level: DEBUG
                Region: global (DC: dc1)
                Server: true
               Version: 1.5.1

==> Nomad agent started! Log data will stream in below:
...
    2023-03-19T15:34:30.081+0900 [DEBUG] nomad.vault: starting renewal loop: creation_ttl=72h0m0s
    2023-03-19T15:34:30.082+0900 [DEBUG] nomad.vault: successfully renewed server token
    2023-03-19T15:34:30.082+0900 [INFO]  nomad.vault: successfully renewed token: next_renewal=35h59m59.999944054s
...
4.2 Set env for Nomad
export NOMAD_ADDR='http://127.0.0.1:4646'
4.3 Job spec 설명
Nomad Job을 해석하면 다음과 같다.
job "mtls-service-a" {
  datacenters = ["dc1"]

  type = "service"

  group "service" {
    count = 1

    network {
      port "https" {
        static = 7433
      }
    }

    # vault에서 할당받을 Polocy를 명시 한다.
    # 해당 Policy로 생성되는 Token의 변경시 동작은 change_mode에서 지정한다.
    vault {
      namespace = ""
      policies = ["pki"]
      change_mode = "noop"
    }

    task "python-task" {
      driver = "raw_exec"

      config {
        command = "local/start.sh"
      }
      template {
        data = <<EOH
#!/bin/bash
cp -R /Users/gs/workspaces/hashicorp_example/vault-examples/mtls-pki/python_service_a python_service_a
cd python_service_a
pip install requests flask
python main.py
      EOH
        destination = "local/start.sh"
      }

      # Vault Agent에서 구성했던 Template이 Job내에 정의된다.
      template {
        data = <<EOH
{{- /* ca-a.tpl */ -}}
{{ with secret "pki/issue/example-dot-com" "common_name=service-a.example.com" "ttl=2m" }}
{{ .Data.issuing_ca }}{{ end }}
      EOH
        destination = "/cert/ca.crt"
        change_mode = "noop"
      }
      # 인증서가 변경되는 경우 change_mode에 지정된 restart를 통해 Job을 재시작한다.
      template {
        data = <<EOH
{{- /* cert-a.tpl */ -}}
{{ with secret "pki/issue/example-dot-com" "common_name=service-a.example.com" "ttl=2m" }}
{{ .Data.certificate }}{{ end }}
      EOH
        destination = "/cert/service-a.crt"
        change_mode = "restart"
      }
      template {
        data = <<EOH
{{- /* key-a.tpl */ -}}
{{ with secret "pki/issue/example-dot-com" "common_name=service-a.example.com" "ttl=2m" }}
{{ .Data.private_key }}{{ end }}
      EOH
        destination = "/cert/service-a.key"
        change_mode = "noop"
      }
    }
  }
}
change_mode 의 경우 인증서 변경후 동작을 정의하는데,
noop은 아무 동작도 수행하지 않음을 의미한다.restart는 Job을 재시작한다.signal은 system signal을 호출하며, systemctl로 실행되는 프로세스의 경우SIGHUP을 지정하면 reload 동작이 발생한다.
4.4 Job 실행
앞서 Python을 직접 실행했던것과 같이 Nomad 를 통해 Python을 실행하며, 조건은 동일하다. Flask에서 파일 체크를 위해 추가했던 extra_files는 삭제해도 된다.
nomad job run service_a_job.hcl
nomad job run service_b_job.hcl

Vault 에서 가져온 인증서가 변경되면 change_mode에 정의된 restart 에 의해 애플리케이션을 자동 재시작 한다.

5. Consul의 mTLS
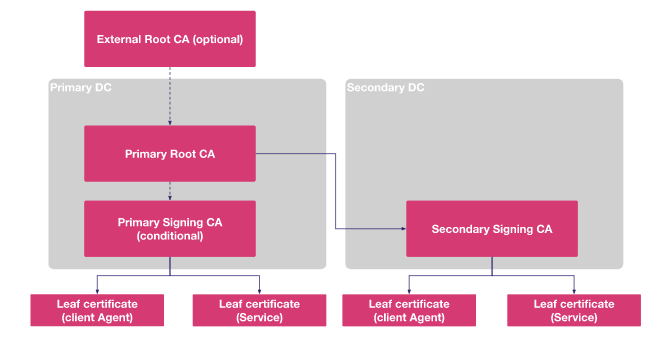
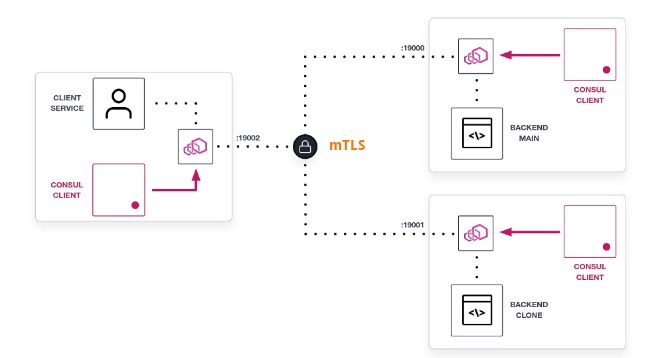
Consul에서는 mTLS를 위한 인증서를 각 애플리케이션에서 분리하여 envoy로 구현된 proxy에서 이를 대체한다. 따라서 애플리케이션에는 별도 mTLS 구현이 불필요하며, 인증서 교체를 Consul이 제공하는 proxy가 담당하게 된다.
Consul Service Mesh에서 기본 제공하는 mTLS를 사용하는 경우 장점은
- 애플리케이션 개발에 mTLS 및 인증서 관리가 불필요하다.
- Consul 내에서 인증서가 자동 교체된다.
- mTLS의 서비스 간 인증 외에 Intention과 같은 서비스 요청에 대한 방향성을 지정 가능하다.
단점은 Consul의 Control Plane과 Data Plane을 구분하는 동작으로 인해 추가적인 리소스가 발생한다는 점이다.


